Getting Started with myDegreePlanner

myDegreePlanner is an application for running and viewing
degree audits.
Degree audits are used by advisors, students,
administrators, etc., to evaluate students’ progress toward a program of study
completion.
The source for the student data used/displayed in
myDegreePlanner is myZou.
The online version of myDegreePlanner is referred to as
Self-Service (vis-à-vis a client-based part of the application, to which
advisors and students lack access).
It is a web-based application; it runs in one of the supported
browsers listed below without having to install additional software.
myDegreePlanner is available via Windows and Mac computers
running Internet Explorer (version 11 or later, Edge), Mozilla Firefox, Google
Chrome, or Safari. Limited functionality—running degree audits only—is also
available via mobile devices running Android (Chrome browser only) or iOS
(Safari browser only).
This guide assumes you are running myDegreePlanner on a
Windows computer. myDegreePlanner runs on Apple devices as well; however, the
screen/icons might be slightly different—in some circumstances—from what
appears on this guide.
To log in to myDegreePlanner access https://mydegreeplanner.missouri.edu using
one of the supported web browsers listed above.
The University of Missouri System application log in screen
will then appear.
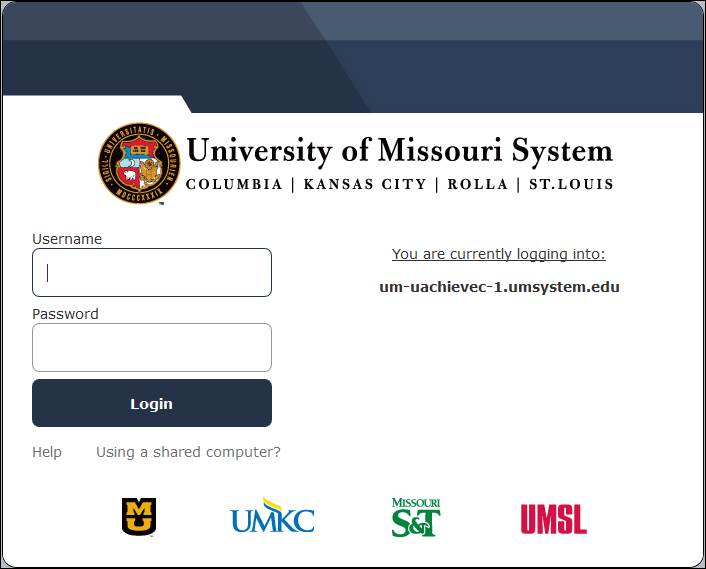
Enter your username and password (the same credentials you
use to log in to your desktop computer), and then click the Login button.
Upon successful log in, the myDegreePlanner Self-Service Home
screen will display in advisor mode.

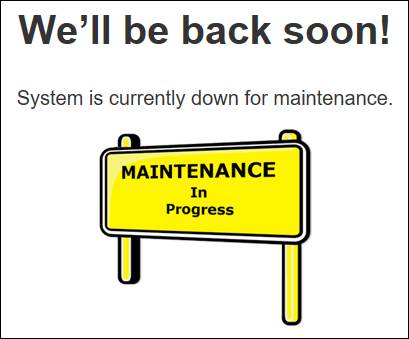
If a Maintenance In Progress page displays instead, it
means that the system is undergoing regularly scheduled maintenance. There is
no need to report this is as service outage. You should simply try to log in
later.
If this error appears

or some other error message displays or the screen freezes,
you should report the issue to degreeaudit@missouri.edu.
If you are helping a student access myDegreePlanner, be
aware that Student mode does not have a Home screen. Students are taken
directly to the Request an Audit screen.
Users with Advisor and Student roles will default to Advisor
mode, but clicking on the Home icon will reveal a Student Access
icon which opens the Student View screen.
The home icon  is the first item on the gold
menu bar, in all myDegreePlanner screens. Clicking on it brings you back to
the Home screen.
is the first item on the gold
menu bar, in all myDegreePlanner screens. Clicking on it brings you back to
the Home screen.
Items on the Home screen menu bar are replicated as
icons below it. You may use either to navigate around the application.
Use the myDegreePlanner menu items/icons/links that appear
in the browser’s main window to navigate the application. Do not use the
browser’s menu items/buttons that appear in the browser’s header—such as the Back
button—as this can result in undesirable outcomes.
The menu bars at the top of the Self-Service screen provide
common, seamless navigation across screens and applications.
Advisor mode may display two menu bars: a gold one (most screens;
may be black if you change the default colors, see the Style section
below), and, below it, a gray one (while in the Students screens).
 Student mode displays a single gold menu
bar.
Student mode displays a single gold menu
bar.

The Utilities menu item provides access to custom
applications. Navigation within these applications is sometimes different, and
when so, it is explained in the Utilities Menu section below.
The navigation scheme will adapt to varying screen
resolutions/sizes (including mobile devices). In smaller screens you may see a
Main Menu button and/or a Student Menu button instead of the
bars. Clicking on the buttons will offer the same options as the
aforementioned gold and gray bars.


You can change the application’s color via the Select
your style: toggle buttons that appear at the top right of the Home
screen. The two choices are gold and black.
Contextual help is available on some screens via the help
icon and as a menu option item via the Settings
icon
and as a menu option item via the Settings
icon  . Click on the icon/option to access
related content.
. Click on the icon/option to access
related content.
Always log out of the application when no longer using it.
This both releases system resources and prevents unauthorized use. To log out,
select the Log Out option in the Settings menu, and then follow
the on-screen instructions.
Search for a Student 
Click the Students icon
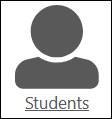
to access the Student Search screen.
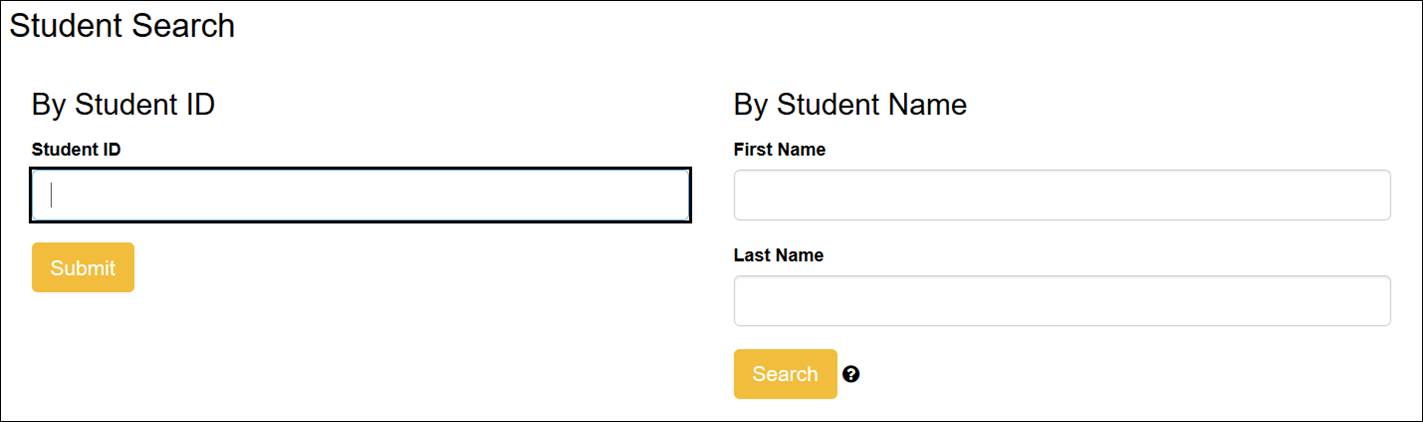
Enter the 8-digit student ID in the Student ID field.
Then press Enter on your keyboard or click the Submit button.
If the search succeeds, the Request an Audit screen
opens.
If the search returns no matches, the following error
message displays.

If this happens, you should correct the student ID
information and resubmit your search, or use the more powerful student search
tool in myZou to find the student ID and run the degree audit from within myZou
(in the Student Services Center, click on the Request Degree Audit
link).
Student ID partial match searches and wildcard searches are
not supported in myDegreePlanner at this time. The Student ID must match the
myZou Student ID exactly. Enter the Student ID in its entirety, including
leading zero(es), if any.
You can also search by first name, last name, or a
combination of both. myDegreePlanner uses myZou’s preferred name information.
The searches try to match the specified criteria against person information in
myZou (students and non-students), but the documentation below uses
“student” instead of the more generic “person,” as typically you will be
searching for a student.
Enter the search criteria into the First Name and Last
Name fields, then press Enter on your keyboard or click the Submit
button.
If the search succeeds, the name(s) and Student ID(s) of
the matching student(s) appear.

Click the  icon in the Select
column to choose a student and access the student’s record; the Request an
Audit screen will open.
icon in the Select
column to choose a student and access the student’s record; the Request an
Audit screen will open.
If the search returns no matches, the following error
message displays:

If this happens, you should refine your search and resubmit
it, or use the more powerful student search tool in myZou to find the student ID
and run the degree audit from within myZou (in the Student Services Center,
click on the Request Degree Audit link).
The search by student name functionality supports partial
matches, as follows: The search algorithm will try to match the first and last
name criteria you specify to the start of students’ first and last names
respectively, as they appear in myZou. No wildcard characters are necessary/supported.
Searches apply the criteria in the same manner as begins with search
criteria in myZou searches.
However, you should enter as much information in the First
Name and Last Name fields as possible. If your search criteria are
not very specific, a very large set of matches might ensue.
Search results are sorted by the student’s full name (last,
first middle).
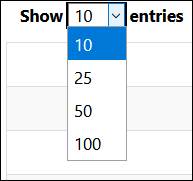
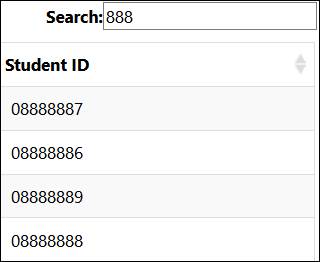
Navigation aids for the search results include:
·
A
dropdown selector to choose number of items to be displayed at one time (top
left of the search results grid). By default selecting 10, it can be increased
up to 100.
·
A
search box to performs string queries against the entire set of results (top
right of the search results grid). You can search for matching strings of text
in both the Student Name and Student ID fields. The matches
display as a filtered subset of the initial search results.
·
A
pair of navigation buttons to move between subsets of results (bottom right of
the search results grid).

Request an Audit 
The Request an Audit screen has three main sections:
One to request an audit for the default program/catalog year (Run Declared
Programs), one to request an audit for a different program/catalog year (Select
a Different Program), and a section with several fields to configure your
request by changing the default settings (Advanced Settings).
This is the default option for the Request an Audit
screen, and, therefore, is the only one that fully displays when first
accessing the screen.
The displayed grid includes all programs of study (majors,
minors, certificates, etc.) associated with the student in myZou, for which a
degree audit exists.
Click on the Run Declared Programs button to run an
audit for all listed programs. If multiple programs are listed, and you wish to
run an audit for a single declared program, you will need to use the what-if
feature described below (Select a Different Program).
Wait until the Completed Audit Requests screen stops
updating (see additional notes below re information/options that will display
on the Completed Audit Requests screen).
The just completed audit(s) will be added to the existing
list of previously executed audits (if any). It is from this screen that you
will be able to access the audit results. Refer to the section on View the
Audit for additional details on accessing the results.
Additional notes regarding the Completed Audit Requests
screen: While the audit request is processing, the screen will display an informational
segment at the top.

It provides options to stop (stop ) and to
cancel the request (Cancel Running Audits).
If you click the (stop ) option, the display
will stop refreshing every three seconds.
If you click the Cancel Running Audits link,
the Completed Audit Requests screen opens.
In neither case does the audit actually stop running. To
see an audit that was stopped or canceled as described above, you will have to
navigate to Audits > Manage and select the (typically) most
recent audit on the list.
When first accessing the Request an Audit screen, an
alert appears if the student has no matching declared programs in myZou:
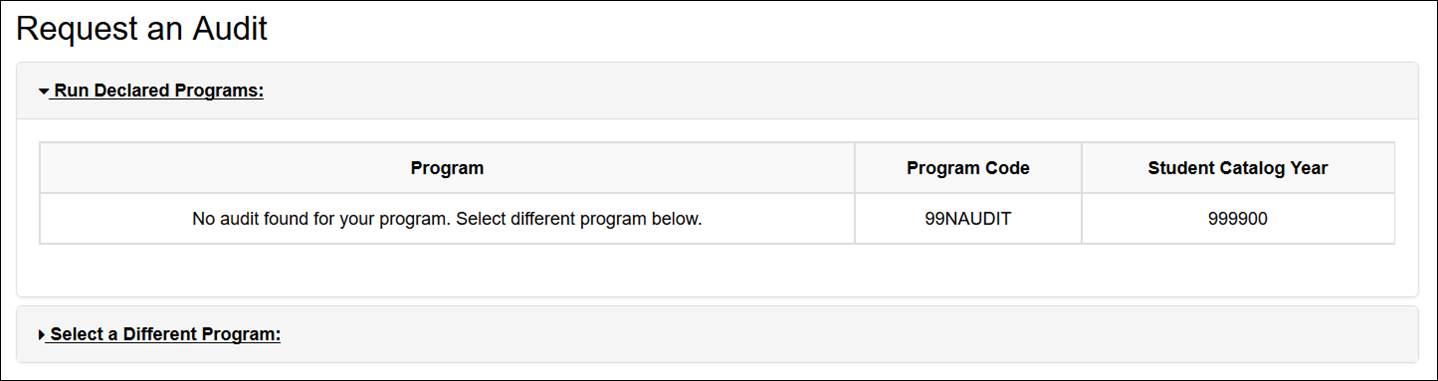
If this happens, you can select a different program. You
should also select a different program if the student is associated with
multiple programs of study and you wish to run an audit for a single program,
or, if you wish to run an audit for a program/catalog year other than the
default one(s) (what-if functionality), or for a non plan/subplan-based “degree
audit” report (e.g., to see if a student has completed all General Education
requirements, you can run a report for the GENERAL EDUCATION REQUIREMENTS –
MUGENEDU “program”).
To select a different program, click the Select a
Different Program link. This minimizes the Run Declared Programs
area, expands the Select a Different Program area, and allows for
selection of a different program/catalog year.
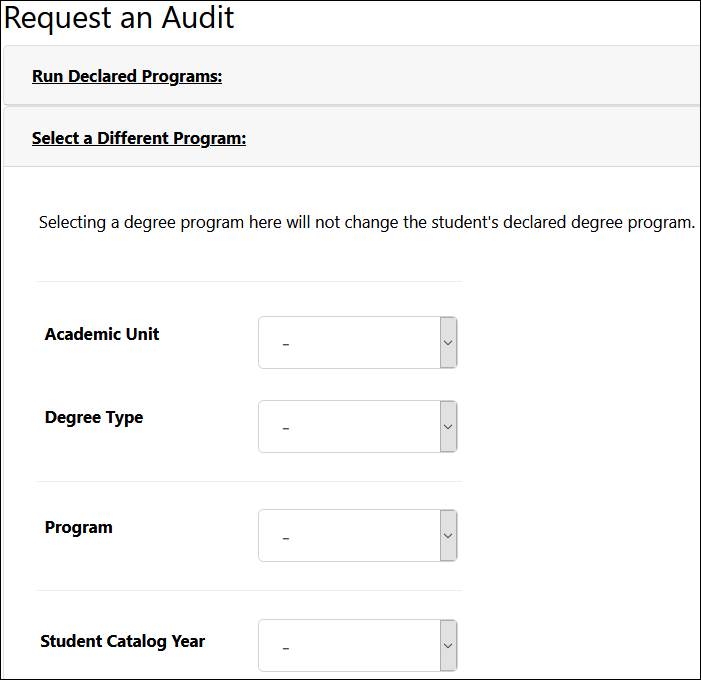
Select the Academic Unit of the program, then select
the Degree Type (Bachelor, Master, etc.), Program, and Student
Catalog Year. Each selection filters the options in the box below, narrowing
down the options for ease of use. If you are unsure of the academic unit in
which a program resides, set the Academic Unit field to blank, and a
full listing of all programs for which a degree audit is available will be available
from the Program drop-down list.
Click on the Run Different Program button to run an
audit for the selected program/catalog year.
The audit report will automatically open once the audit
finishes processing.
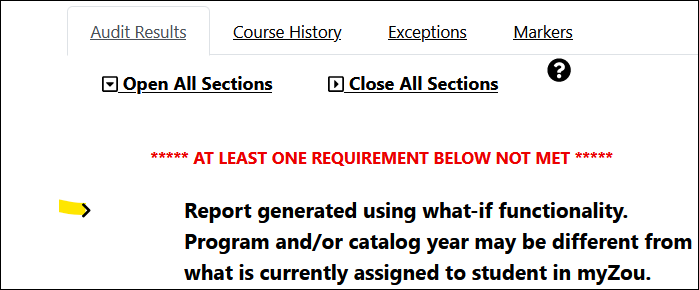
The report will display a message indicating that the audit
report was generated using an alternate program and/or catalog year:
Note: The values entered in the Select a Different
Program area remain until you exit the application, even if you switch to a
different student. However, the Run Declared Programs option is always
the default. To reuse the criteria previously entered in the Select a Different
Program area, you must click on the Select Different Program
link before you run the next audit.
The Advanced Settings section of the screen includes
several fields that allow you to set options for each audit by changing the
default settings.
To display the fields, click on the Click
to view available options. link
that that appears to the right of the Advanced Settings section header.
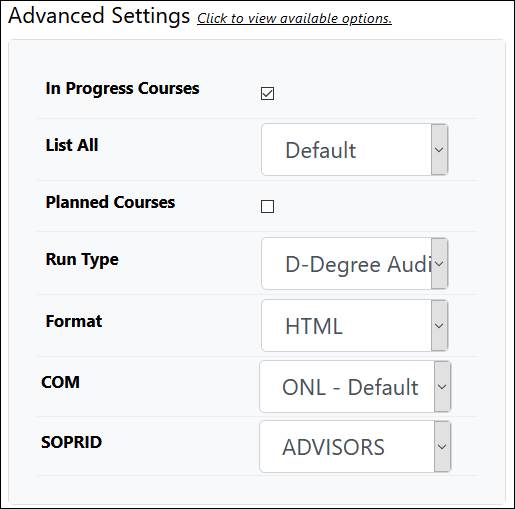
The In Progress Courses checkbox determines whether
a student’s in progress (IP) courses will be included in the audit. This
option defaults to checked; thus, IP courses will be included unless you uncheck
the box. Please note that this option considers all coursework associated with
future terms as being in-progress.
The List All drop-down selection determines which
requirements and details to include in the audit. The options are:
Default: This
is the standard report.
Include Pseudo: This report includes requirements and subrequirement “names,“
which are referred as “pseudo-course” (“pseudo”, for short). Some exceptions
require you to manually enter a pseudo, in which case you might have to run an
audit with this option to figure out the pseudo you should use. If the pseudo
still doesn’t show, try using the Full Listing setting.
Full Listing: The report includes information about the encoding underlying
the degree audit. Used mostly to debug new audits, and the like.
The Planned Courses checkbox determines whether a
student’s planned courses will be included in the audit. This option defaults
to unchecked; thus, planned courses will not be included unless you check
the box.
The Run Type drop-down selection determines the
order of courses listed. Options are:
D-Degree Audit: The
default.
S-Audit w/Course Sort: Use only if the student’s record includes
what-if/planned courses, to force these courses to sort ascendingly by term.
The Format
drop-down allows you to choose the audit report format. Options are:
HTML: The
default and recommended format.
PDF (single column): This format generates a PDF version of the HTML
audit. Note that this is not the traditional 2-column PDF; the 2-column PDF is
available through the Utilities menu after the audit run
completes and the HTML- or PDF-formatted report displays, and also via
the custom UM Batch application (see below).
The COM field allows you to bring in a number of
predefined options stored in an external table. The default option is the ONL
table. The following additional options/tables are available:
FINAL - Final Audit for
Archival: Selecting this table will cause the degree audit report
to be marked as the final degree audit for a given degree/student.
NOFTR - Exclude Future Term Coursework: Selecting this table will cause
future term(s) coursework to be excluded from the audit; this can be useful for
athletic certifications, and other similar processes.
NOIPT - No IP/Planned Coursework Subtotals: Selecting this table will
suppress the tallies of in-progress and planned coursework. All in-progress
and planned courses (if included in the audit) will be tallied with EARNED
credits.
The SOPRID drop-down allows you to choose who can
see the audit report. Options are:
Advisors: The default value; advisors
and degree audit staff can see the report.
Students: Advisors, degree audit staff, and the student can
see the report.
Note: The advanced settings apply to audits run under
either the Run Declared Programs or the Select a Different Program sections
above. They do not “stick” from run to run, but instead reset to the default
settings after each audit completes, so that a subsequent audit request does
not inadvertently execute with unintended settings.
View the Audit Report 
Reports from previously ran audits display in the Completed
Audit Requests screen. The reports can be in HTML or PDF format.
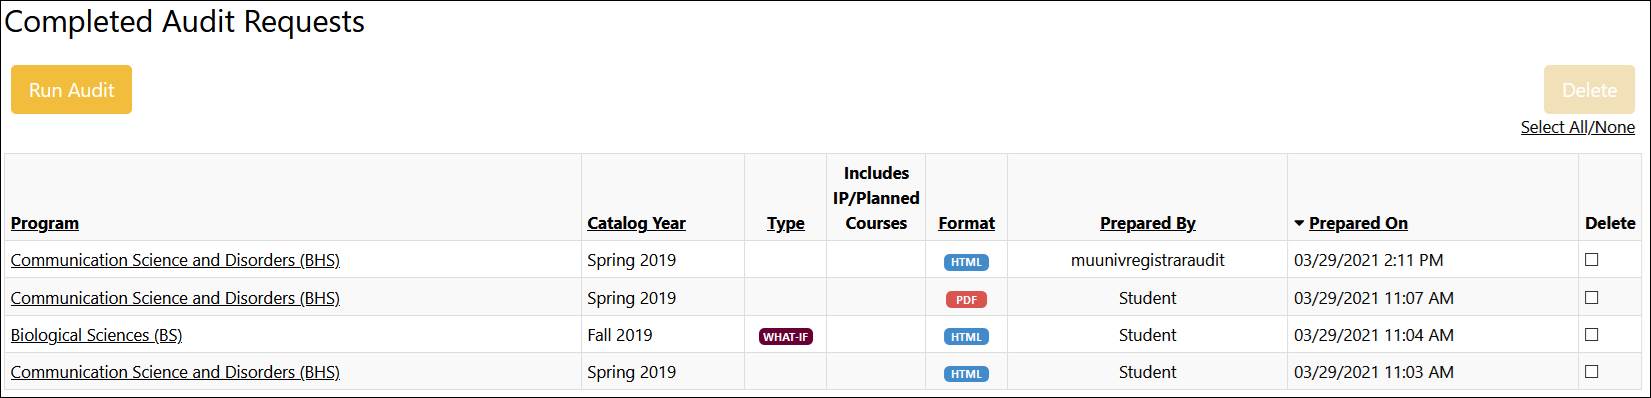
The Completed Audit Requests screen opens
automatically after a default program audit finishes executing. (This screen
is bypassed for what-if audits, as the report opens automatically.)
To access the Completed Audit Requests screen without
running an audit, click on the Manage option of the Audits menu
item on the gray menu bar.
The screen displays a grid: one row per audit report and, within
that row, the following fields:
Program: The program of study used in
the degree audit.
Catalog Year: The catalog year used
in the degree audit.
Type: The  icon
displays if the audit report is generated via the Select a Different Program
option.
icon
displays if the audit report is generated via the Select a Different Program
option.
Includes IP/Planned Courses: The icon displays
if the audit includes in-progress coursework. The
icon displays
if the audit includes in-progress coursework. The  icon
displays if planned courses are included (planned courses may also include in-progress
courses).
icon
displays if planned courses are included (planned courses may also include in-progress
courses).
Format: The  icon displays if the report is in HTML
format. The
icon displays if the report is in HTML
format. The  icon displays if the report is in single-column
PDF format (see the Advanced Settings section above for details).
icon displays if the report is in single-column
PDF format (see the Advanced Settings section above for details).
The Prepared By and Prepared On fields
display information about who created the report and when.
The last column on the grid allows selection of reports for
deletion. Once selected, the report(s) can be deleted by clicking on the Delete
button. Below the Delete button, the Select All/None link
allows selection/deselection of all reports at once.
By default, the most recent degree audit report displays at
the top, with the rest displaying in descending order of preparation. You can
change the sort order by clicking on any of the hyperlinked column headings.
To open one of the listed reports in the viewing screen,
click on the hyperlinked program title in the Program field (first
column).
The report-viewing screen includes a header, and below it four
tabs: Audit Results, Course History, Exceptions and Markers.

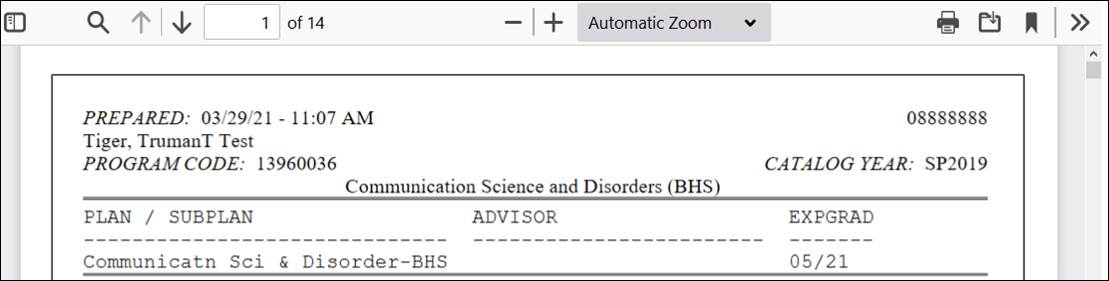
Screen Header
The
header includes data about the student, the audit’s program of study, and the audit
itself, including a unique job ID. You should always provide the value in the Job
ID field when reporting a problem/concern about a specific audit report.
It also includes a shortcut Request Audit button;
clicking on it returns you to the Request an Audit screen.
When viewing HTML reports, advisors with an
exception-creation role also see an Enter Exception Mode button;
clicking on it sets the audit report in exception entry mode, which is the
recommended best practice for exception entry. Refer to the HTML Report
Exceptions Mode section below for detailed instructions about creating
exceptions via the HTML report.
This tab displays the audit report, in either HTML
(default) or PDF format (see the Advanced Setting section above for information
on how to select report formats). The reports are static; they
do not refresh each time you view them. The reports are visible for seven days;
then they are archived (see Appendix IV: Archived Reports). To access a
current report, request a new audit, which will generate a new report.
The reports are comprised of four sections: a header, the
body/main section, a miscellaneous information section, and a footer.
Report Header
The header displays information about the student’s plan(s)/subplan(s) (majors,
minors, certificates, emphases) with an active status in myZou, the associated
advisor(s), and expected graduation date(s).
The information for each plan/subplan program of study
(including advisor information) ceases to display once the student completes
the plan/subplan. It is then replaced by information concerning the completed
program of study. This includes certificates, minors, emphases, and degrees earned
at Mizzou.
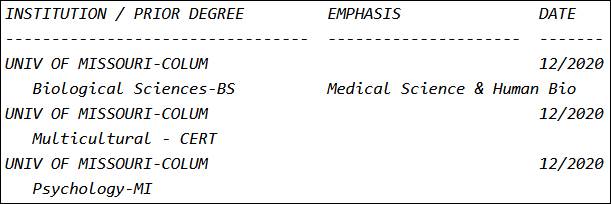
Degrees earned elsewhere also display, if recorded in
myZou.
Below this section, a summary line reports whether all
of the audit’s program of study requirements have been met.


Variations of these messages display if in-progress and/or planned
courses are included in the audit.


Most reports begin with text outlining introductory
information or general requirements (e.g., for undergraduate degrees, General
Education requirements), then list program of study specific requirements, both
required (numbered) and optional (not numbered).
The HTML report main section is described in detail below,
in the Navigating the HMTL Audit Report section.
The traditional 2-column PDF report displays via the Utilities
menu option (see the PDF (two columns) Audit Report section below).
The single-column PDF report displays in a container
window:
If the window does not open by default, you need to
configure your browser via the browser’s applications options (set the
PDF-documents viewer to “preview in browser” or similar option).
The window includes various browser-dependent options to
view, navigate, print, and download the report. It displays only a small
portion of the report at the time; it is not designed for use as the primary
report-viewing tool. Once you are satisfied that you are looking at the
correct report, you should download it and view it in your regular PDF document
viewer.
You may also download the single-column PDF report via the Download
PDF Audit link that appears immediately below the Audit
Results tab label.

The data displayed in this section is informational only,
i.e., it does not outline degree requirements. The following categories and
subcategories of courses and GPAs display if there is data to be displayed
therein (i.e., categories lacking data do not display). Additionally, some
categories only display on certain types of degree audit reports.
General Electives
Additional Coursework Information: This subsection lists
the following categories of courses:
Community College Courses
Converted Courses: Courses for which the subject codes or course numbers have
changed since the student completed them.
Cross-Listed Courses
Graduate Courses
Honors Courses
In Progress Courses: Includes in-progress and incomplete coursework.
Incomplete Courses
MOTR Courses
Online Courses: 100% online courses
Reduced Credit Courses (Before Reduction): Courses for which the credit hours
were reduced due to credit limits (on the type of course, etc.).
Reduced Credit Courses (After Reduction): see above.
Satisfactory/Unsatisfactory Courses
Transferred Courses
Transferred Courses – Currently Under Evaluation – Not Final: See explanation
below.
Biological Science Courses, Physical Science Courses, Mathematical Science
Courses, Behavioral Science Courses, Social Science Courses, Humanities and
Fine Arts Courses, and Rejected Courses: These categories display in degree
audit reports for degrees in the College of Arts and Sciences only.
Audited Courses (Hearer): This type of coursework is not included in the body
of the report.
Exam Credit
Undergraduate Courses
NR-Graded Courses
Post-Baccalaureate Courses
Professional Courses
Transfer Courses - Currently Under Evaluation/Not Final:
This section contains a “negative subrequirement” that is always met, unless
the student’s record contains transfer courses currently under evaluation. If
such courses exist, the following message displays: “Please contact the
Admissions Office to have the following courses evaluated and posted to your academic
record as applicable.”
Course(s) Not-Applicable to the Degree: The courses listed
in this subsection did not apply to any of the degree’s requirements.
Withdrawn: Courses from which the student
withdrew (W grade).
Do not Meet Course Grade Requirement
Do not Meet Any Degree Requirement
Ignored Due to Repeat Policy
Duplicate Without Repeat Policy Applied
Other Ignored Courses
Other GPAs: Other GPAs are listed for
informational use only and may not be used to determine eligibility for
graduation.
Overall: May include transfer
and MU coursework.
UM - Official GPA of Record: Includes all UM coursework as modified by the MU
course repeat policy.
MU: Includes all MU coursework as modified by the MU course repeat policy.
Transfer: Includes transfer coursework (both from UM
System and Non-UM System institutions)
Major GPA: Includes all transfer and MU major coursework.
The report footer includes five sections:
1) Signature
lines/disclaimer
2) GPA
descriptions
3) Information
about PDF and 2-column PDF reports’ codes (*), course codes, and special
grades.
4) A
brief description of exceptions that applied to that specific degree audit, the
userID of the person who created the exception, and the date it was added to
the student record.
5) A
FERPA confidentiality warning.
(*) The HTML report includes icon representations of these codes. See the Key/Legend
section below for details re these icons.
HTML reports initially display in abridged mode, with only
requirement headers showing. Additionally, several informational and
navigation items display to the left of each requirement.
Opening and Closing Requirement Sections
Use
the Open all Sections or Close All Sections links or
icons (
 ) located below the Audit
Results tab to open (display details) or close (hide details) all
requirement sections at once.
) located below the Audit
Results tab to open (display details) or close (hide details) all
requirement sections at once.
Sections that are closed display with a right-pointing icon
next to them . Sections that are open display a
down-pointing icon
. Sections that are open display a
down-pointing icon  . Clicking on these icons opens/closes one
section at the time.
. Clicking on these icons opens/closes one
section at the time.
Key/Legend
An abbreviated key/legend of the informational icons that
appear to the right of each requirement/subrequirement displays at the bottom
of the HTML report.
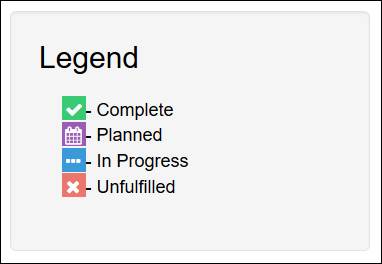
Additionally, clicking on the  icon opens
the full key for the HTML report, describing icons, course codes and special
grades.
icon opens
the full key for the HTML report, describing icons, course codes and special
grades.

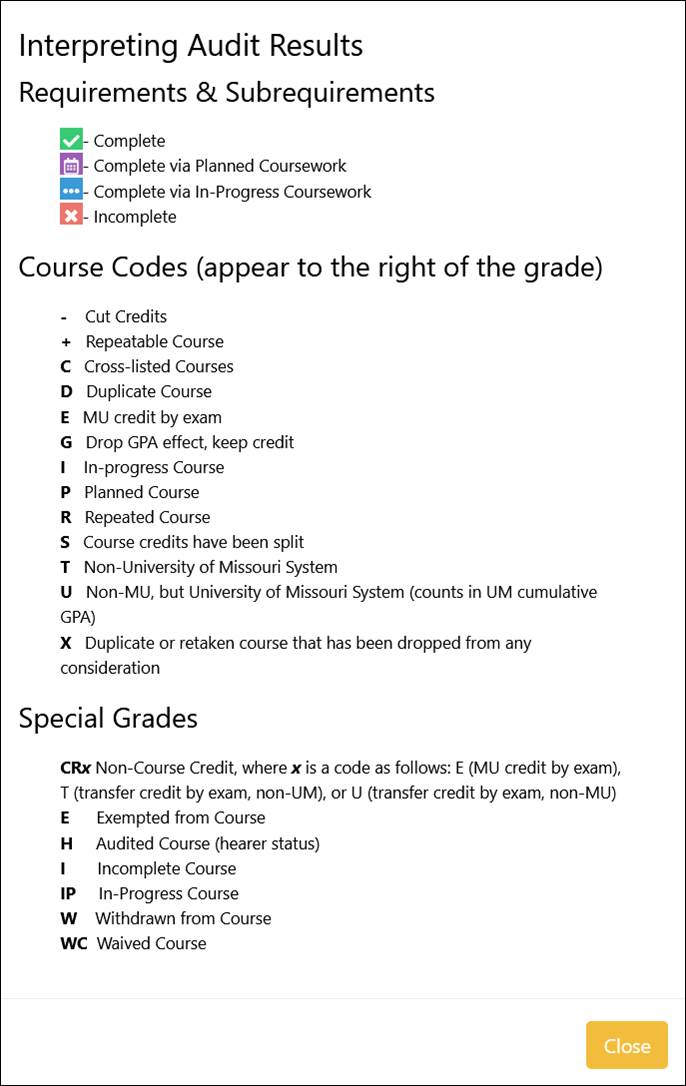
To close the key screen, click the Close button.
Printer Friendly
On the far-right side of the Audit Results display is a link to a “printer
friendly” version of the HTML report:
Clicking on this link opens a new browser tab displaying
the HTML report by itself (no frames/tabs/buttons/etc.). To print it, use the
browser’s printing functionality.
Close or switch tabs to return to the Audit Results
window.
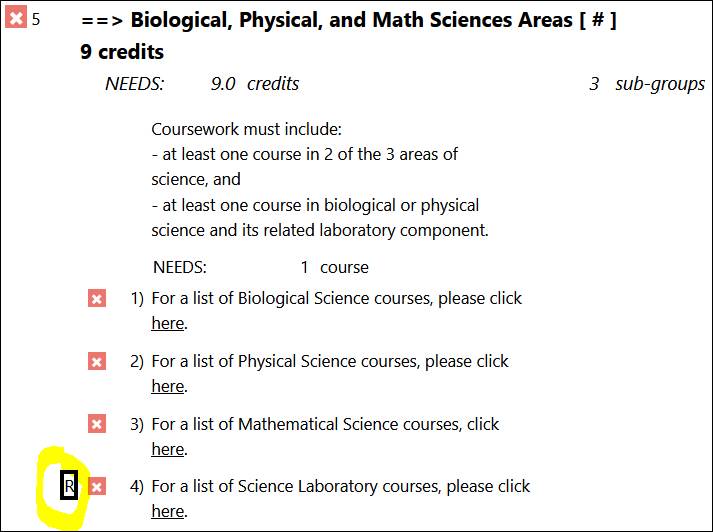
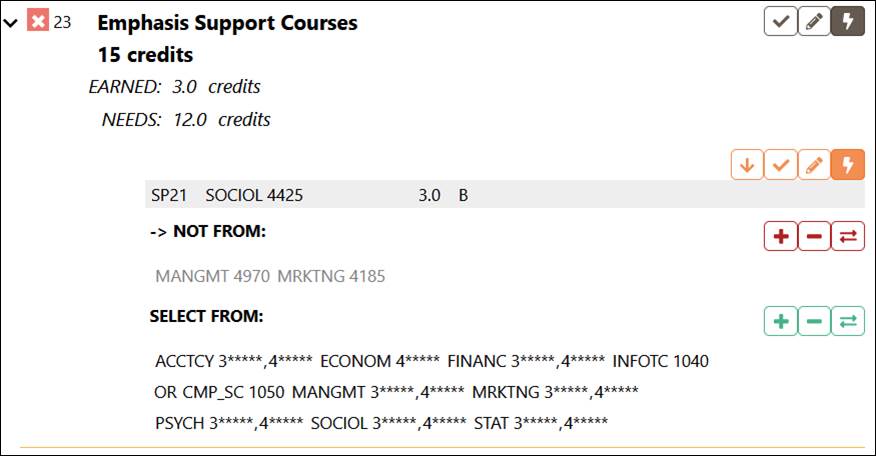
Requirements/Subrequirements
The report body includes information about required,
optional, and informational requirements, and the requirements’ subrequirement(s).
Whether a given requirement/subrequirement displays and the level of detail
that displays is determined dynamically at run time based on existing
coursework, exceptions, other programs of study, report detail level, etc.
e.g., an informational subrequirement indicating whether a student is on
academic probation might only display if the student is actually on probation,
or if running a Full Listing report.
Requirements
Typically, requirements include:
- a requirement
number,
- a title,
- a
summary line indicating the number of credits or subrequirements (referred as
sub-groups) needed/earned to complete the requirement, and
- subrequirements.
Optional requirements do not include a requirement number; OPT
appears instead.
Informational “requirements” are also unnumbered, and
typically contain no subrequirements; they may contain instructions,
descriptions, examples, or serve as section separators. e.g., the signature
lines.
Subrequirements
Typically include:
- a subrequirement
number,
- a
title,
- a
summary line indicating the number of credits or courses/set of courses that
are needed/earned to complete the subrequirement, and
- lists
of courses that the student
o has
taken,
o can take
(SELECT FROM), or
o can’t take
(NOT FROM)
to fulfill the subrequirement.
It may include an icon denoting that the subrequirement is
required  (vis-à-vis an option from among a set of
subrequirements).
(vis-à-vis an option from among a set of
subrequirements).
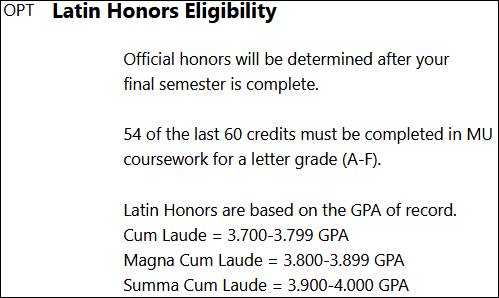
 Informational subrequirements do not
“count-up” to the number of subrequirements needed to fulfill a requirement;
rather, they provide information only. e.g., the Latin Honors subrequirement
may inform an undergraduate student concerning honors eligibility in a specific
academic unit, based on current cumulative grade point average.
Informational subrequirements do not
“count-up” to the number of subrequirements needed to fulfill a requirement;
rather, they provide information only. e.g., the Latin Honors subrequirement
may inform an undergraduate student concerning honors eligibility in a specific
academic unit, based on current cumulative grade point average.
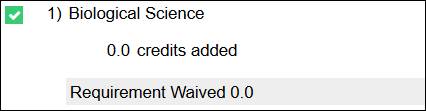
A “Requirement Waived” notation appears if the subrequirement
has been waived via exception.
Courses included in SELECT FROM and NOT FROM
lists are hyperlinked
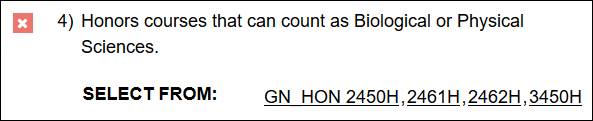
to a pop-up screen displaying course information, if there
is an exact match to a course in the current myZou catalog.
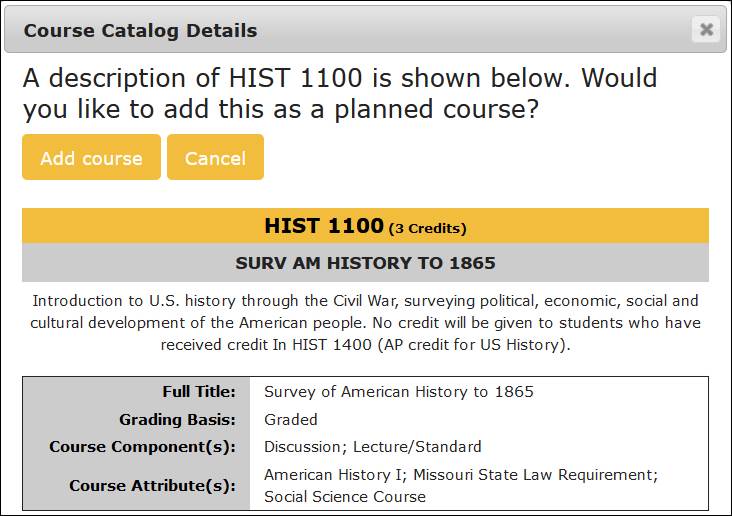
To add the course to the student’s planned courses list,
click on the Add button (see the Planned Courses Screen section
for additional details). To close the screen, click the Cancel button.
Advisors can have one of two levels of access: create/edit/read
exceptions, or read-only. The functionality described in this section and the Exceptions
section further below assumes you have access to add exceptions. If you have
read-only access to exceptions, functionality will be limited to those screens
that display already existing exceptions.
Within myDegreePlanner there are two ways to create exceptions
to a student’s program of study’s requirements/subrequirements: Starting from
the HTML report, and through the Exceptions screen available via the
gold menu bar. The recommended method for creating exceptions is via the HTML
reports screen. Exception data editing however, is always done in the Exceptions
screen accessible via the gold menu bar.
This section provides an overview of the exception mode, which
is available from within the HTML reports viewing screen only. For details
concerning specific exceptions, see Appendix I.
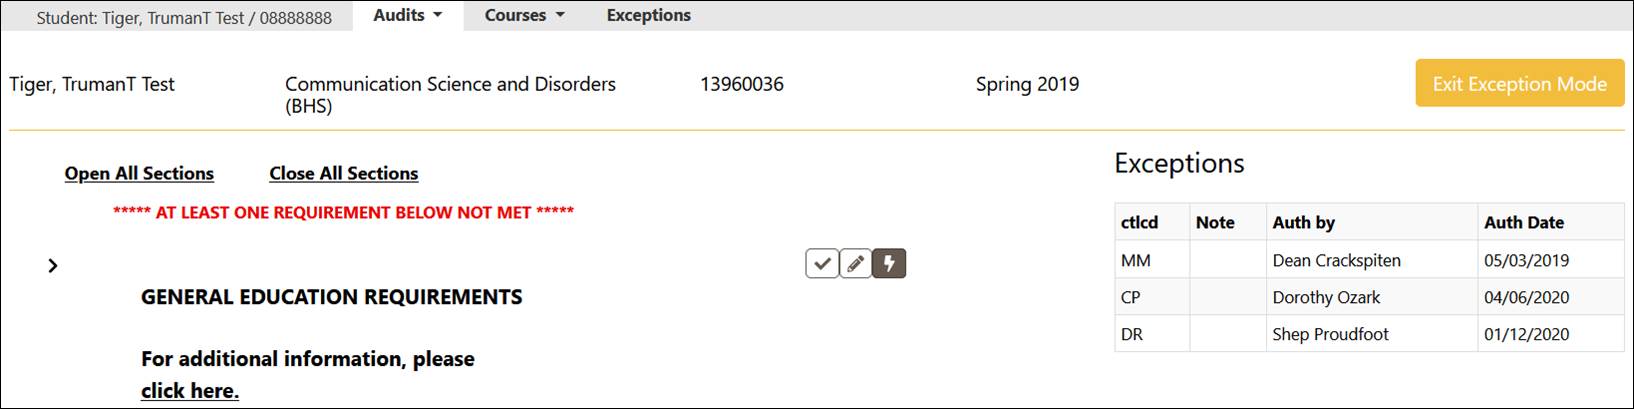
To enter exception mode, make sure your browser displays on
a landscape-oriented monitor (vs. portrait) as you will need quite a bit of
horizontal space to display the various parts of the screen, and then click on
the Enter Exception Mode button on the top right corner of the screen.
Once clicked, the button changes to Exit Exception Mode. A list of the
student’s existing exceptions (if any) will show in the top right corner of the
screen.
Exception Icons
Exception icons appear to the right of the requirements and
subrequirements. The icons are color-coded according to the level (gray/black =
requirement, yellow/orange = subrequirement, red = course (NOT FROM) or green = course (SELECT FROM).
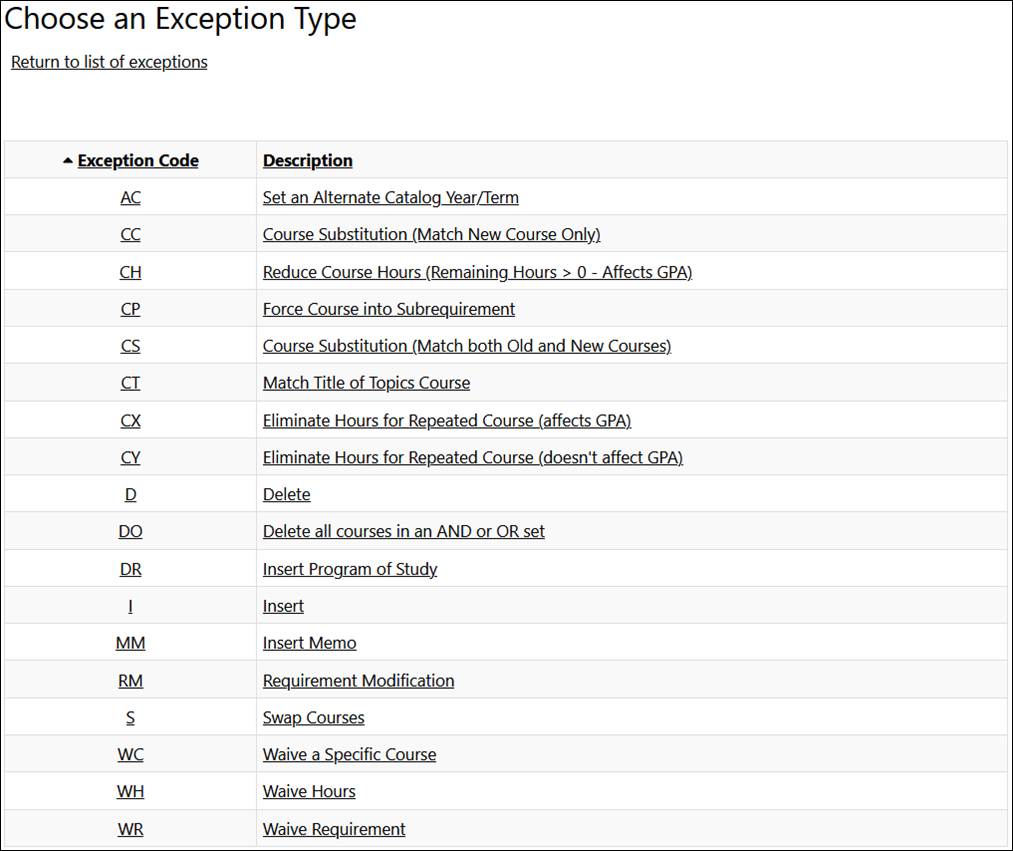
There are eighteen types of
exceptions available via myDegreePlanner. The following icons correspond to
exception types directly accessible in exception mode. They allow you to
create the eight most common/simple exceptions.
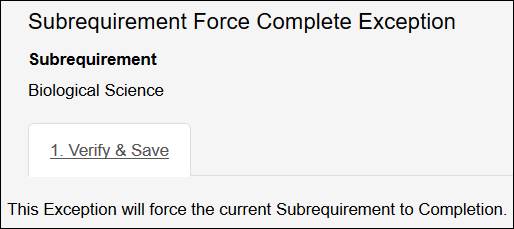
 Force
requirement complete (WR)
Force
requirement complete (WR)
 Edit
requirement (RM)
Edit
requirement (RM)
 Force
subrequirement complete (WR)
Force
subrequirement complete (WR)
 Edit
subrequirement (RM)
Edit
subrequirement (RM)
 Force
course (CP)
Force
course (CP)
 Add
course to SELECT FROM (I) /
Add
course to SELECT FROM (I) /  Add course to NOT FROM (I)
 Remove
course on SELECT FROM (D) /
Remove
course on SELECT FROM (D) /  Remove course on NOT FROM (D)
 Swap
course on SELECT FROM (S) /
Swap
course on SELECT FROM (S) /  Swap course on NOT FROM (S)
Create an Exception
To create an exception while in exception mode, first,
ensure that you locate the icons at the appropriate level (requirement,
subrequirement, or course), then click on the desired icon.
A pop-up screen will open, typically to the right of the
requirement/subrequirement (it may also open at the bottom of the screen, if
the screen resolution is such that the pop-up will not fit on the side).
Some exception entry screens have only one tab, while
others have two or more.
Enter the exception details pertinent to the exception type
in the fields that appear in the tab(s).
The following fields are located on the Verify &
Save tab for all exceptions.
·
Restrict to this Degree Program: This
checkbox defaults to checked. Do not uncheck the box.
o
Unchecking
this box would make the exception global (potentially applicable to all Mizzou programs
of study!).
o
If
you need to create an exception that applies to all programs of study within an
academic unit (semi-global exception), see the Exceptions Screen section
below.
·
Audit Note:
o
WR
exception only: Field is auto-populated with “Requirement Waived” text. Do not
edit.
o
WH
exception only: Field is auto-populated with “Hours Waived” text. Do not edit.
o
Other
exceptions: You may enter a brief note that will appear in the subrequirement
area of the audit (limited to 27 characters).
·
Memo: Always enter a memo describing the
exception.
·
Authorized by: This field is auto-populated
with your userID but that can be changed. It should contain the name of person
who authorized the exception (not the operator creating the exception, unless
the two are the same person).
·
Date: This field is auto-populated. It should
reflect the exception’s authorization date.
There is a second set of
hidden userID and timestamp fields that record who actually created/last
modified the exception (which print on the degree audit reports).
See Appendix I for specific instructions regarding
other fields in each exception type.
The following buttons allow you to save and/or cancel the
modification/creation of an exception:
·
Save & Run Audit: Click to end exception
entry and generate a new audit report.
·
Save & Add Exception: Click
to enter multiple exceptions before creating a new audit report.
·
Cancel: Click to exit exception entry/modification
without saving any of the entered information.
To complete the process, you MUST click the Save &
Run Audit or Save & Add Exception button. Exiting the exception
screen without clicking one of these buttons is equivalent to clicking the Cancel
button (no data is saved, and focus returns to the main HTML report screen).
Reports generated via the Save & Run Audit button default to HTML
format. If you wish to run an audit in single-column PDF, click the Save
& Add Exception, and then request an audit via the standard interface
(see the Advanced Settings section above).
The Advanced Exceptions icon  provides
a shortcut to the Exceptions screen. This screen allows creation of all
exception types (e.g., Course Substitution - CC). It includes advanced options
for the exceptions listed above that are not available in the simplified
interface available via exception mode.
provides
a shortcut to the Exceptions screen. This screen allows creation of all
exception types (e.g., Course Substitution - CC). It includes advanced options
for the exceptions listed above that are not available in the simplified
interface available via exception mode.
Whenever you need to create an exception via the
Exceptions screen (because the tabbed interface available via HTML mode
does not provide sufficient level of detail for the exception or because the
exception is not available via HTML mode), always access the Exceptions
screen via the  icon (vis-à-vis the Exceptions
menu item on the gold bar), as this will prepopulate a number of key fields.
icon (vis-à-vis the Exceptions
menu item on the gold bar), as this will prepopulate a number of key fields.
See Appendix I for additional details on each
exception type.
Course History Tab
This tab displays coursework information, up to 32 terms, both on-campus and
transferred-in, as recorded in myZou. In-progress and planned courses appear
if such courses were included in the audit request that generated the report
you are viewing. Incomplete courses always appear, even if in-progress courses
are excluded from the audit report.
You can change the sort order by clicking on the hyperlinked
column headers. You can also filter the list by selecting values for the Grade
and/or Term drop-downs, and then clicking the yellow arrow icon  . To
return to the full list, select the default Grade and Term values
in the respective drop-downs, and then click on
. To
return to the full list, select the default Grade and Term values
in the respective drop-downs, and then click on  .
.
Exceptions Tab
This tab lists all the exceptions that could apply to the audit, which might be
a subset of all exceptions that exist for the student. The full list of
exceptions for the student is available via the Exceptions screen (see the
Exceptions Screen section below).
Exceptions appear in the order in which they were created.
You can change the sort order by clicking on the hyperlinked column headers.
You can also filter the list by using the Code drop-down, selecting an
exception code, and then clicking on the yellow arrow icon . To
return to the full list, select the default Code value in the drop-down,
then click on .
Markers Tab
Markers are sets of requirements that can be included in addition to or instead
of the regular set of requirements.
For
example: Some programs of study offer the option of selecting specialization “tracks”;
advisors can add such tracks to a student’s degree audit via markers so that the
student can see what coursework they must complete.

Please email degreeaudit@missouri.edu if you need assistance with creating
tracks for a given program of study.
Planned Courses Screen

To access the Planned Courses screen, select the Courses
item from the gray menu bar and then click on the Planned option
The planned courses screen allows advisors (and students)
to add courses to an audit to simulate their effect on program of study
completion.
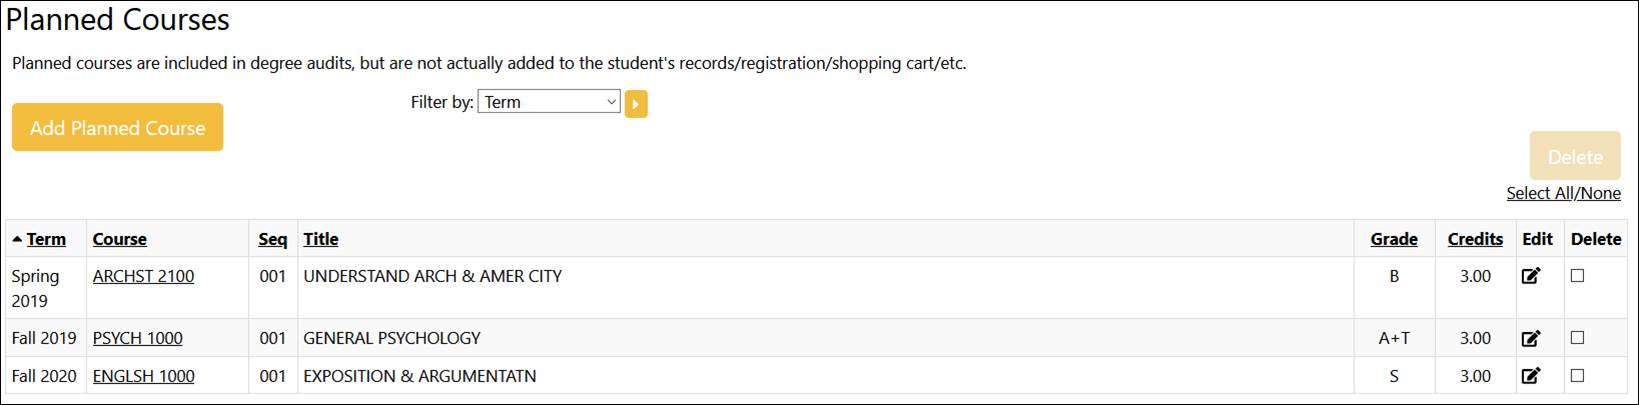
Courses listed in the Planned Courses screen appear
on an audit report/courses tab if the audit request that generated the report
was configured to include them in the Advanced Settings. Inclusion of
planned courses in the audit is not the default option.
You can change the listed courses sort order by clicking on
the hyperlinked column headers. You can filter planned courses by selecting a
value in the Term field and clicking on the yellow arrow icon . To
return to the full list, select Term in the drop-down and then click on .
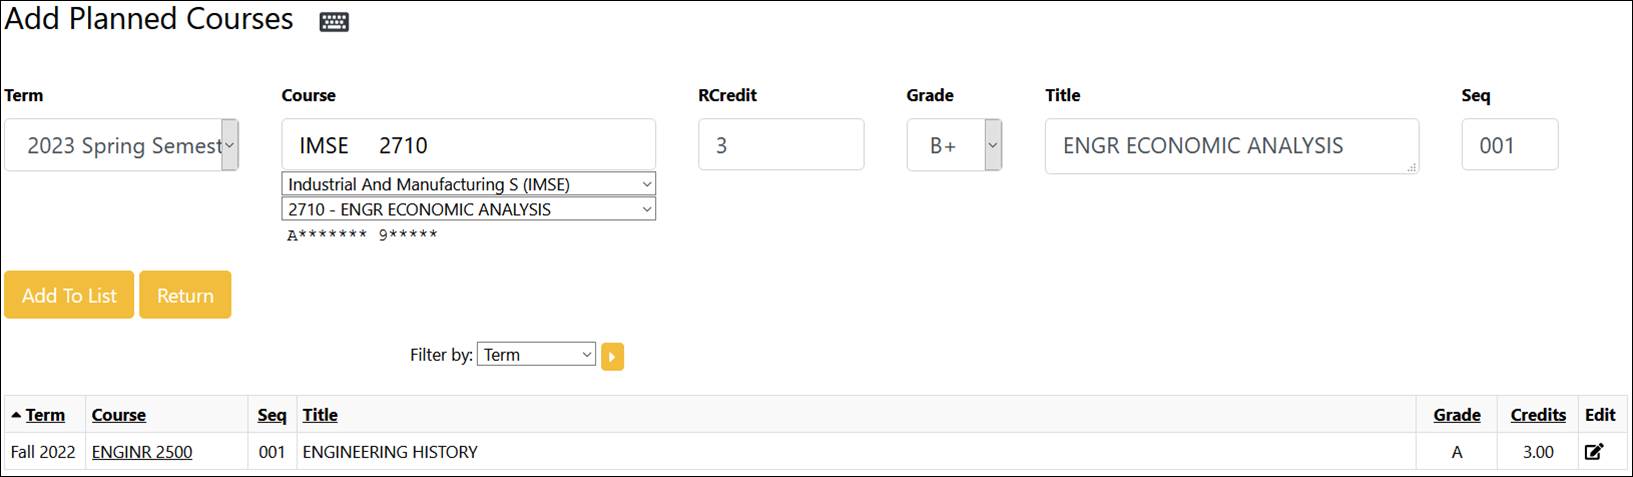
Adding a Planned Course
·
Click
the Add Planned Course button.
·
Select
a Term for the course.
·
Select
the Course subject code and course number using the drop-down lists of
values located under the Course field. The Title will
automatically populate once the course number is selected.
You can also type in the subject and
course number information directly into the Course field, but this is
not considered best practice, as it can lead to invalid course data. If you
choose to type in the course information, separate the subject code and the
course number with a backslash only. This will ensure proper spacing at save
time. e.g., MATH\1100.
This is a required field.
·
Enter
the credits in the RCredit field.
This is a required field.
·
Enter
the expected grade in the Grade field.
If the planned courses are expected to be completed elsewhere, select grades
ending in T (transfer) or U (transfer from UM-System school) respectively.
This is a required field.
·
Enter
the course title in the Title field (automatic if course subject/number
is selected via dropdowns).
·
Ensure
the three required fields above have values, and then click the Add To List
button to save the planned course. If all required fields are not present, an
error message will display and all data for the course will be discarded.
·
You
may enter a single course or multiple courses. Click the Return button
when done.
You may also add a specific planned course by clicking on
the Add button available on the course information pop-up screen. See
the Subrequirements section above for details.
Exceptions Screen 
The Exceptions screen
displays select information about all existing exceptions for a given student.
The screen is available in read-only mode to advisors lacking create/modify
exceptions access.
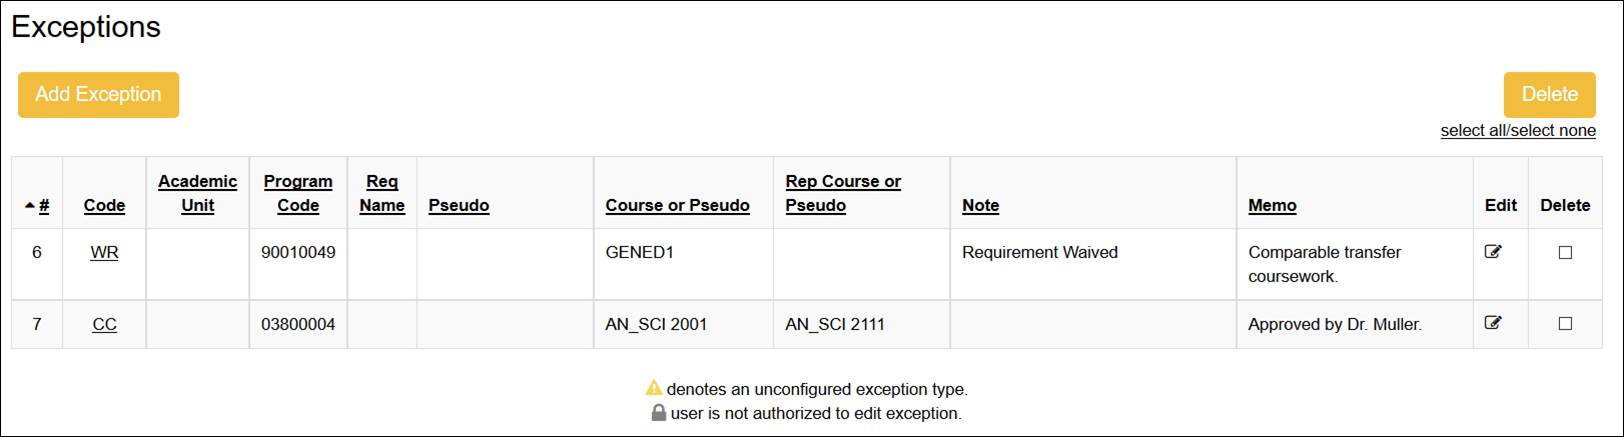
Certain exceptions are unavailable
via Self-Service (they are “unconfigured” and are accompanied a  icon).
They can only be entered/modified by staff in the University Office of the
Registrar.
icon).
They can only be entered/modified by staff in the University Office of the
Registrar.
Clicking on an exception’s
hyperlinked Code value displays all the available information for that
exception.
Click on the Done
button of the Details screen to return to the Exceptions screen.
·
Click
on the Add Exception button.
Note: It
is strongly recommended that exceptions be added via the  icon
available in HTML exception mode. This prepopulates a number of the fields
listed below.
icon
available in HTML exception mode. This prepopulates a number of the fields
listed below.
·
Choose an Exception Type by clicking on the
hyperlinked value for the Exception Code or Description field.
·
Select
a value for one of the following two fields:
o
Academic Unit (AU) only if you need to
create a semi-global exception applicable to all programs of study within an
academic unit, or
o
Program Code to create a program of study
specific exception.
There
is no need to select a value for the AU if you need to create a program-specific
exception, but doing so narrows down the list of values in the Program Code
field to those programs in the AU only, thus avoiding possible mistakes caused
by similarly titled programs of study in different AUs. If you choose to
filter the program values this way, be sure to blank out the AU after you
select the program. This will ensure that the exception will continue to apply
to the program of study, even if it moves from one AU to another.
Never leave
both fields blank, as that would create a global exception, potentially
applicable to all programs of study at Mizzou!
·
Memo: Always enter a memo describing the
exception.
·
Authorized by: This field is auto-populated
with your userID but it can be changed. It should contain the name of person
who authorized the exception (not the operator creating the exception, unless
the two are the same person).
·
Date: This field is auto-populated. It should
reflect the exception’s authorization date.
Note: There is a second set of hidden userID and timestamp fields
that record who actually created/last modified the exception. These fields
print in the degree audit report.
·
See
Appendix I for specific instructions regarding other fields in each
exception type.
·
Click
the Save button to save the exception details and return to the Exceptions
screen. Or click the Cancel button to end the exception creation
process without saving the data.
·
Click
on the Edit icon to edit an exception’s details.
·
Edit
as needed, then click the Save button.
·
To
cancel editing without saving changes, click the Cancel button.
Click on the Delete checkbox on the row of the
exception you need to delete, and then click the Delete button.
There is also a Select all/None link below
the Delete button, allowing for selection/unselection of all
exceptions. Use with care, as deletions are irreversible; there is no undo
button.
Note: The title of the viewing,
adding, and editing screens described above can be misleading, as it is the
concatenation of the words “Details”, “Add”, or “Editing” respectively, and the
exception’s title. e.g., “Insert Detail” means you are viewing an Insert
exception’s details, “Add Delete” means you are adding a Delete exception,
“Edit Delete all Courses in an AND or OR Set” means you are editing a very specific
type of Delete exception (code DO), and the like.
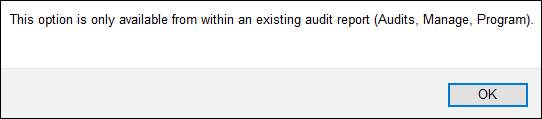
Utilities Menu

The Utilities menu item in the gold menu bar
provides access to three custom applications: PDF (two columns), UM Batch,
and Photo.
PDF (two
columns) Audit Report
The
option to display the 2-column PDF report is available from the report-viewing
screen of HTML- or PDF-formatted audit reports only (Audit menu item, Manage
option, Program column hyperlinked value). An error message displays if
you select this option from any other screen.
It does not execute a new audit. It merely displays an
existing audit report in a different format.
Therefore, if you need to see current results, you must run
a new audit first (HTML- or PDF-formatted report, it does not matter which),
and then select the PDF (two columns) option.
Selecting the PDF (two columns) option of the Utilities
gold menu item either opens a PDF document in the application associated with
PDF documents viewing (if one is configured), or asks that you select a
suitable viewer, or prompts you to save the document (these options are
browser/OS dependent). If you are unable to access the 2-column PDF report,
without receiving the error message noted above, you may need to ask your local
IT person for assistance with configuring your PDF document viewer.
UM Batch
The batch custom application allows you to run audits for multiple students
with a single request.
It consists of two screens: One to create batch requests
and one to view the results.
Selecting the UM Batch option of the Utilities
gold menu item, opens a new browser tab displaying the Batch Request screen.
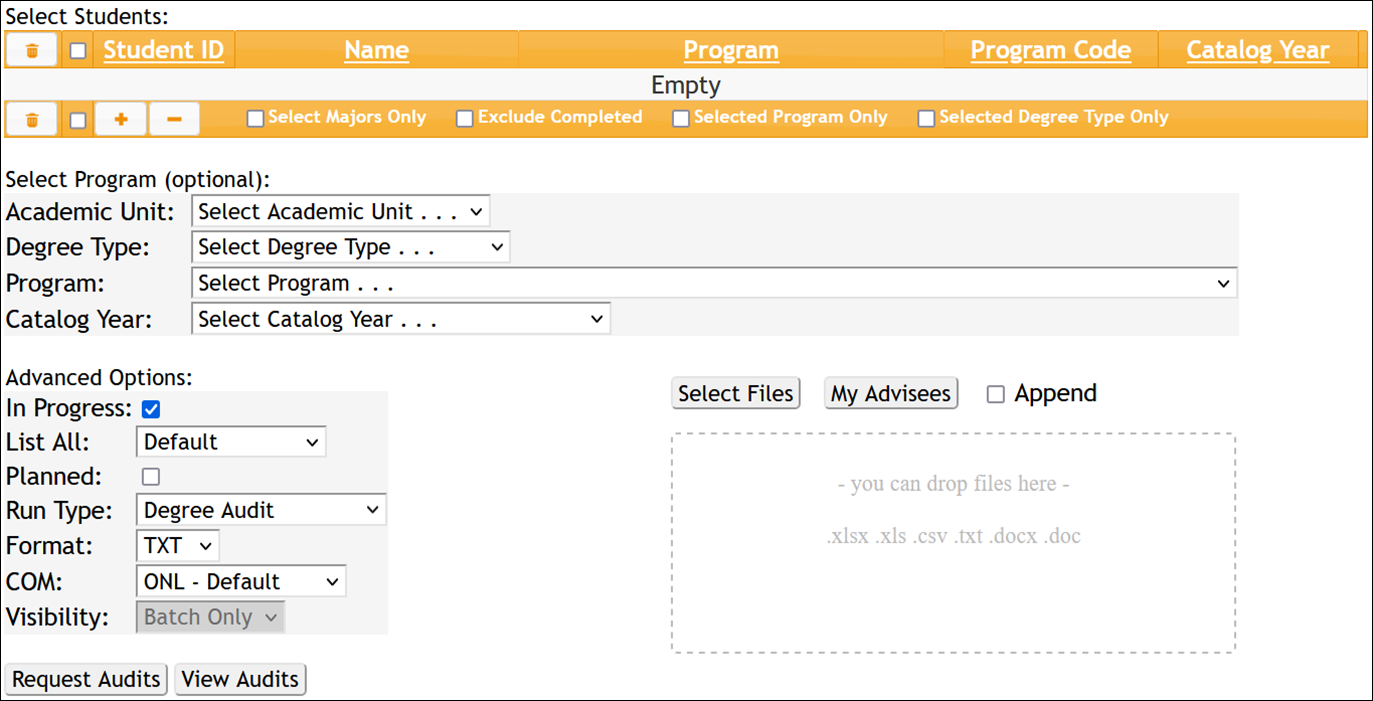
The batch request screen has four sections for entering
criteria for the batch request, which correspond to three functions:
1. Selecting
a student population (manual entry, one at the time, via the Select Students
section; or in bulk, via the Upload IDs section, where the Select
Files and My Advisees buttons are located),
2. selecting
an alternate program of study, and
3. setting
advanced options.
These are functionally equivalent to the Student Search,
Select a Different Program, and Advanced Settings features of
myDegreePlanner.
You can run a batch for a single student, a few students,
or thousands of students. Very large batches should be executed during
off-business hours to ensure adequate performance for all users.
Manual Entry
Click the plus symbol to add the first Student ID. Enter
all eight digits, including any leading zeros, and press the Enter key.

The student’s name, myZou declared program(s) of study,
program code(s), and catalog year(s) will auto-populate. If some of this
information is unavailable, the pertinent fields will remain blank.
To add additional students, simply repeat the process.
Upload IDs
Rather than typing individual Student IDs, you may upload a
file containing multiple Student IDs.
Supported file formats include Excel, Word, TXT, and CSV.
The upload tool attempts to match all numbers in the file
to Student ID numbers, including prepending zeros to numbers that are less than
eight digits long. Therefore, the file should contain no other numerical
information beyond the Student IDs.
To upload a file, either click the Select Files
button to open your operating system’s file browsing tool and select a file, or
drag and drop a file into the drop box below the Select Files button, or
click the My Advisees button (to upload information for all students for
whom you are a designated advisor in myZou).
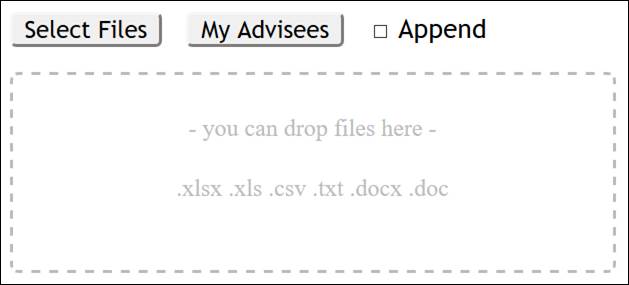
The information of the students in the file, or the advisees’
information, overwrite previously selected students’ information, unless you first
select the Append checkbox.
A spinning wheel will display when processing a file
containing large number of Student IDs.
Entering an invalid Student ID results in an -
Invalid Student ID – error message in the Name field. Uploaded invalid Student
IDs list at the top of the grid.
Multiple active programs of study in myZou will result in
multiple rows for the same student (this is OK).
If a valid email exists in myZou for the student, the
student’s name will be hyperlinked to that email address.
You may select/unselect single rows via the checkbox
located to the left of the Student ID field.
You may select/unselect rows listing non-major programs of
study by clicking the Select Majors Only checkbox.
You may unselect rows listing completed programs of study
by clicking the Exclude Completed checkbox.
You may unselect rows listing programs of study not
matching the program of study selected in the Program field, by clicking
the Selected Programs Only checkbox.
You may unselect rows listing
programs of study not matching the degree type selected in the Degree Type field, by clicking the Selected Degree Type Only checkbox.
Note: After a row is unselected due to checking one (or
more) of the three checkboxes (Select Majors Only, Exclude Completed,
Selected Programs Only), you can still force individual rows to be
included in the batch by manually reselecting the individual row (click on the
checkbox to the left of the student Name field).
You may add or delete rows via the  icons.
You may also delete selected rows by clicking on the trashcan
icon .
.
To adjust the Name or Program column width,
click and drag the header columns separator (vertical bar between headers).

You may sort the list of students by clicking on the
hyperlinked column headers (Student ID, Name, Program, Program Code, Catalog
Year). Note: The order on the screen will determine the order in which the audit
reports will appear in the view audits screen and resulting combined file.
Select a Different Program/Catalog
(What-If)
This section is optional. Executing a batch with the default values in place
will run audits for the students’ default program(s) of study/catalog(s).
You may use the drop-down lists of values (LOV) for Academic
Unit, Degree Type, Program and Catalog Year to select
a single program of study and/or catalog year for all selected students.

When you select a value(s) for the Program or Catalog
Year, the corresponding values in the Select Students grid will be
struck-through for each affected student, as a visual indicator that the
selected program/catalog year value(s) will be utilized instead.
To unselect a value from an LOV, select the default value as
shown above. You will see the strikethrough disappear from the student rows
for the corresponding field(s).
Advanced Options
This
section is optional. The fields in this section are generally equivalent to
those in the myDegreePlanner Request an Audit screen (see the Advanced
Settings section above; note that the SOPRID field is labeled Visibility).

One small difference is that the default value for the Format
field is the TXT option (the equivalent of the 2-column PDF report).
Unlike reports produced with the HTML and PDF options, reports
generated with the TXT option are not visible via Self-Service.
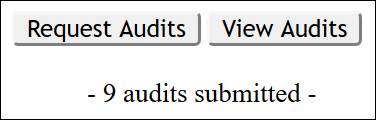
Request Audits
Click on the Request Audits button to submit your request.
The screen will indicate the number of audits submitted. A
spinning wheel displays during the initial batch submission process.
View Audits
You may click on the View Audits button at any time after clicking on
the Request Audits button.
The View Batch Audits screen will open, displaying a
grid of all of the batches that you have submitted, one row per batch. Each row
displays: a unique batch number (Uyymmddhhmm#####), a View All
button, a Download All button, a date and time stamp, and a batch
processing status (Queued, Executing, or Done). 
The screen refreshes every 5 seconds. You may use the
refresh button  to refresh the screen more frequently.
Once the batch job completes, the status changes to Done.
to refresh the screen more frequently.
Once the batch job completes, the status changes to Done.
Use the select check boxes  (or
press the space bar) in conjunction with the trash can
(or
press the space bar) in conjunction with the trash can  button
to delete batches you no longer need.
button
to delete batches you no longer need.
View All opens a single PDF document
that includes all audit reports.
Download All downloads one zipped
file with individual PDF files for each audit in the batch. The individual PDF
audit documents are named StudentID_dprog_date_jobid&sequence#.PDF.
For batches that are Done, a plus symbol displays to
the left of the batch number.
Select the row for the batch you would like to view, then
click on the + symbol or press the Enter key, to see a detailed list of
the individual audits included in the batch.
To expand/collapse all batch rows listed, click the  icons
at the top of the grid.
icons
at the top of the grid.

For each individual audit, the
Student ID, name, program, program code, and catalog year display, along with an
overall requirements status indicator ( all requirements are
met,
all requirements are
met,  all requirements met using in-progress
courses,
all requirements met using in-progress
courses,  all requirements met using planned courses [also
displays if both IP and planned courses are used],
all requirements met using planned courses [also
displays if both IP and planned courses are used],  not
all requirements met,
not
all requirements met,  there was an error when attempting to run
the audit).
there was an error when attempting to run
the audit).
You may adjust the width of the student name and program
name columns by clicking and dragging the handles that display above and below the
batch details grid.

Click on the View button next to the Student ID to
open a PDF document containing the audit report for that
student/program/catalog year.
Note that all reports viewed within the Batch application
will be in the 2-column PDF format. Additionally, audit reports for batch
requests with the value of the Format field set to HTML or PDF
are visible via Self-Service in either HTML or PDF format, respectively.
Click the exit icon  to
return to the batch request screen.
to
return to the batch request screen.
To switch back to myDegreePlanner, select the
myDegreePlanner browser tab.
To close the batch request screen and return to
myDegreePlanner, close the browser tab containing the batch application.
Photo 
This Utilities menu option is available from any myDegreePlanner screen
that is associated with a single student.
It displays the student’s myZou picture (if one is
available).

Settings Menu 

The Settings menu item in the gold menu bar provides access
to the Help and Log Out options.
Help
Clicking on the Help option opens this document online. Students see a
similar document.
Log Out
To log out of myDegreePlanner, select the Log Out option from the Settings
menu, and follow the onscreen instructions.
Appendix I: Exceptions 
This section provides detailed information on the steps to create/modify
each type of exception.
The following “common fields” appear in nearly all exception-entry
screens: Academic Unit, Program Code, Audit Note, Memo,
Authorized by, and Date. They are fully described in the Create
an Exception and Adding a New Exception sections above.
Most fields that accept course information have associated
list-of-values or type-ahead functionality to simplify course entry. You
should use such functionality whenever possible, to reduce the risk of data
errors. However, in some circumstances you may need to enter course data manually,
or adjust previously entered course data. When doing so, keep in mind the
following guidance.
The total length of course information fields is 16
characters. Courses are identified by subject code (e.g., MATH) and course
number (e.g., 1500).
Subject codes:
- contain letters and underscores only (no numbers or spaces)
- have a maximum length of 8 characters
- begin on position number 1 of course information fields.
Course numbers:
- begin on position number 9
- are always 4 numeric characters long if an MU course
- are a string of up to 6 alphanumeric characters if a transfer course
- may include an additional suffix of up to two letters to indicate that the
course is an honors and/or writing course (H, W, or HW).
Rather than counting spaces to ensure that subject codes
and course numbers are properly spaced/start in the right position, separate
the two values with a backslash without including any blank spaces. e.g.,
MATH\1500. myDegreePlanner will then properly space/align the course information
at save time.
Sections of a course are never entered as part of course
information, but courses sometimes need to be further identified by specifying
the term(s) in which they were offered, and/or the title of the specific
section/offering. When that is required, additional fields are provided.
myDegreePlanner matches courses taken by the student to
courses in the SELECT FROM and NOT FROM lists starting from the
leftmost character and then matching each character to the right, space by
space. Therefore, it is important to ensure that the number part of the course
information starts exactly on position 9.
The match all “wildcard” character is the asterisk (*).
e.g., a subrequirement looking for MATH 2*** will accept MATH 2001,
2100, etc.; it will also accept MATH 2100W and MATH 2001A because
myDegreePlanner doesn’t stop matching characters until it reaches the 16th
position of a course information field.
If you would like for the matching to stop at certain
point, include a pound symbol (#) in that position. e.g., BIO_SC\BIO
would match BIO_SC BIO, BIO_SC BIO1, and BIO_SC BIOL, but BIO_SC\BIO#
would only match BIO_SC BIO.
Note: Course information prior to Fall 2004 has varying
lengths, but you should always enter the current course number for requirement/subrequirement
exceptions, even if the student took the course under the prior nomenclature.
myDegreePlanner will typically automatically convert the old course number to
the new one. If it doesn’t, contact degreeaudit@missouri.edu for
assistance, so that the course can be added to the conversion table. For
course exceptions (code start with C, e.g., CC, CH, etc.), always use the
original course number, even if the course number changed after 2004.
You can create the following exceptions via exception mode
while in an HTML report, by clicking on the appropriate icon. You can later
edit the exception’s details as needed via the Exceptions screen.
You can also initiate the exception creation process while
in exception mode by clicking on the advanced exceptions icon and
then completing the process in the Exceptions screen. You should do
this whenever the options provided by the simplified exception screens/tabs in
exception mode are insufficient to articulate the exception’s details fully.
and
then completing the process in the Exceptions screen. You should do
this whenever the options provided by the simplified exception screens/tabs in
exception mode are insufficient to articulate the exception’s details fully.
Lastly, you can create these exceptions in the Exceptions
screen directly. This is not recommended, as fields such as the academic unit,
program of study, pseudo course information, etc., will not be automatically
populated.
CP — Force Course
into Subrequirement 
The CP exception forces a course into a
subrequirement and overrides condition codes (see Appendix II for a
definition of “condition codes”).
Do not use the force course exception if you
want the requirement/subrequirement to monitor those condition codes.
If you want condition codes to be respected, you should use
the Insert exception icon  instead.
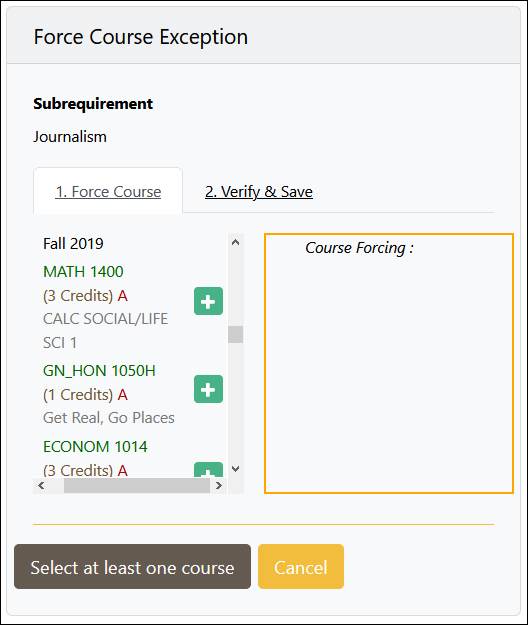
To force a course into a subrequirement, move the course
from the course list into the Course
Forcing box by clicking the add icon  . If
the icons do not show next to the courses (monitor display resolution/location
of the pop-up may affect display), use the scroll bar at the bottom of the list
to scroll right, until the icons appear.
. If
the icons do not show next to the courses (monitor display resolution/location
of the pop-up may affect display), use the scroll bar at the bottom of the list
to scroll right, until the icons appear.
Only courses which the student has taken or added to the
list of planned courses appear on the list. Therefore, if a course is not
showing on the list, you should ask the student to add it to the set of planned
courses. You can also manually add a course via the Exceptions screen,
but this is not recommended.
You can force only one course per exception.
Undo a course addition by clicking the Delete icon .
.
After you select the course, click
the Next button or the Verify & Save tab.
The Exceptions screen for the Force
Course (CP) exception lists a number of additional fields, none of which you
should set/modify.
I
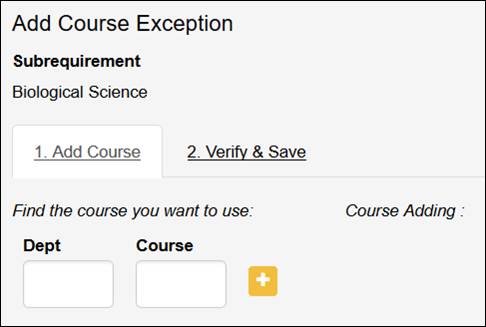
— Insert 
The I exception adds a
course to a subrequirement’s SELECT FROM or NOT FROM line.
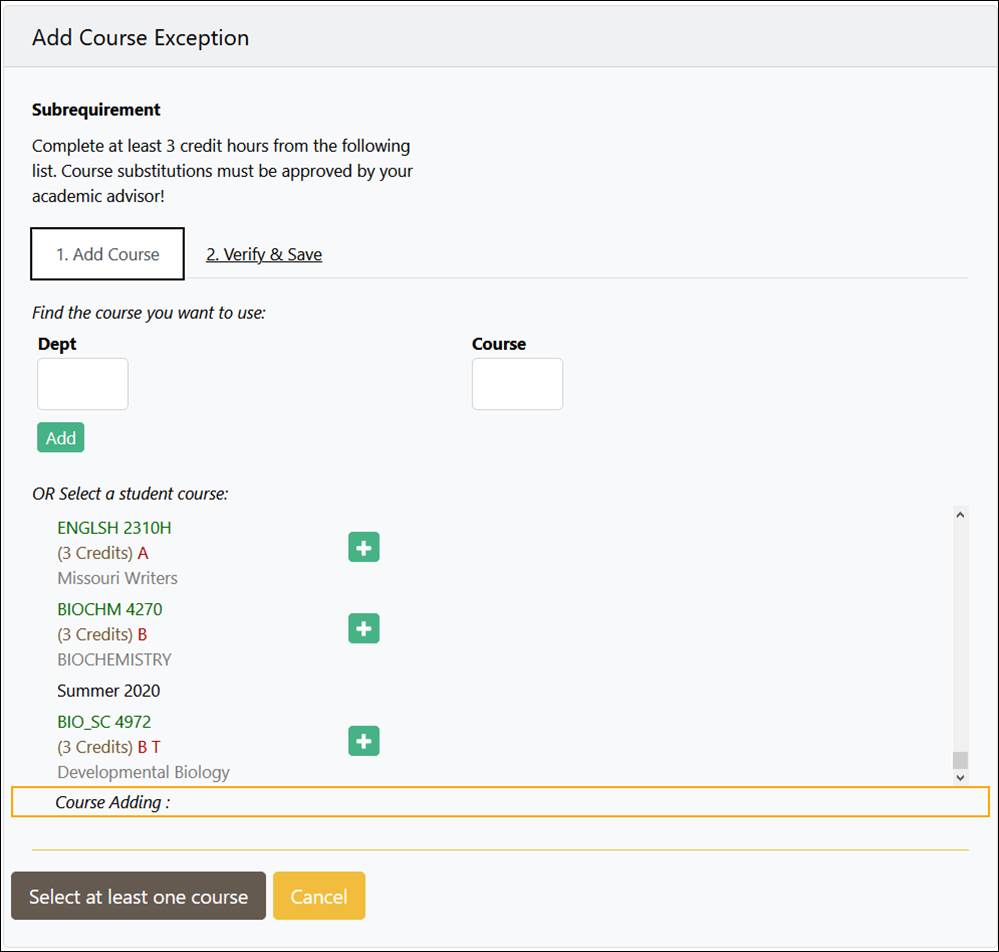
The add course exception button may not be available in
exception mode for some subrequirements, specifically when the requirement or
subrequirement is met, or the list of courses is hidden by design. In such
cases, you must add the Insert (I) exception via the Exceptions screen,
by clicking the advanced exceptions icon  .
.
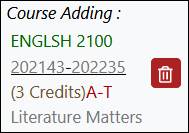
There are two ways to add a course into a
subrequirement via exception mode:
1) Type the subject code
in the Dept field and the course number in the Course field, and
then click the Add button below the Dept field. You should use
this method only when the student is yet to take the course.
2) Move courses from the
list of courses that the student has already taken (Select a student
course) into the Course Adding box on the right by clicking
the  icon that appears next to each listed course.
You can stipulate the terms during which the
student must take/have taken the inserted course by clicking on the Add
Date link:

which displays two fields to enter the earliest
(FYT) and latest (LYT) allowed terms.

Click the recycle icon  to discard the
proposed terms range.
to discard the
proposed terms range.
Click the save icon  to save the required
terms range.
to save the required
terms range.
The terms are encoded as the year plus a 2-digit suffix:
27=Spring, 35=Summer, and 43=Fall. The example above encodes a range from Fall
2021 to Summer 2022 inclusive.
Once you have added a term range to a course, it can only
be removed by deleting the course altogether, or, after saving the exception,
via the Exceptions screen.
You can add one or more courses per exception.
You can undo a course addition by clicking the Delete icon  .
.
After you add the course(s), click
the Next button or the Verify & Save tab.
The Verify & Save tab includes a link to
additional options allowing you to modify the underling subrequirement:
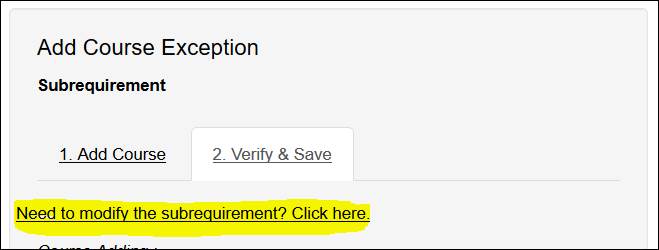
Clicking on the Need to modify the subrequirement?
Click here. link opens a section allowing you to modify the
subrequirement’s number of required courses, credits, and GPA:
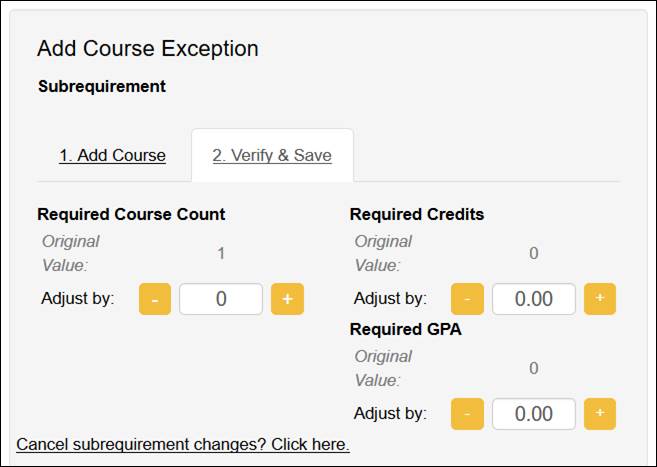
Required Course Count
field: Use the  and
and  icons
to increase or decrease the original values. The
value in the Adjust by field will be added or subtracted from the value
in the Original Value when you save the exception.
icons
to increase or decrease the original values. The
value in the Adjust by field will be added or subtracted from the value
in the Original Value when you save the exception.
e.g., if the original required course count is three (3),
and you adjust it down by -1, the subrequirement will require two (2) courses;
if you adjust it up by 1, the subrequirement will require four (4) courses (not
1; 1 is the adjustment to the original value, not the new value).
A similar process applies for the Required Credits
and Required GPA fields.
Click the Cancel subrequirement changes? Click here
link to exit the section without making any adjustments.
The Exceptions screen for the Insert (I) exception
lists a number of additional fields (Accept/Reject Condition Codes and Assign
Condition Codes).

You should not set/change
these values via an Insert (I) exception. Use a Requirement Modification
(RM) exception instead.
D — Delete

The D exception removes a course from a
subrequirement’s SELECT FROM or NOT FROM line.
The remove course exception button may not be available in
exception mode for some subrequirements, specifically when the requirement or
subrequirement is met, or the list of courses is hidden by design. In such
cases, you must add the Delete (D) exception via the Exceptions
screen, by clicking on the advanced exceptions icon  . You
must also use the Exceptions screen if the course is already meeting the
subrequirement (as it will not appear on the list of removable courses).
. You
must also use the Exceptions screen if the course is already meeting the
subrequirement (as it will not appear on the list of removable courses).
To remove a course from a subrequirement, move the course
from the Select course(s) you want to remove list into the Course Removing box, by
clicking the remove icon  . The course list includes
all courses in the SELECT FROM or NOT FROM line,
which are not currently meeting the subrequirement. If the course is already
meeting the subrequirement, it will not appear on the list.
. The course list includes
all courses in the SELECT FROM or NOT FROM line,
which are not currently meeting the subrequirement. If the course is already
meeting the subrequirement, it will not appear on the list.
You can remove one or more courses per
exception.
You can undo a course removal by clicking the Delete icon  .
.
After you remove the course(s), click
the Next button or the Verify & Save tab.
The Verify & Save tab includes a link to
additional options allowing you to modify the underling subrequirement. Please
see the I — Insert exception section above for details.
Note: When a course is being selected via a wildcard course
(e.g., ITAL 1200 is being selected via ITAL ******), using the Delete (D)
exception to remove ITAL ****** might be too broad of an action, as it would
preclude any ITAL course from satisfying the requirement, and using ITAL 1200
via the Exceptions screen would not match the existing ITAL ****** “course”.
Instead, use an Insert (I) exception to add ITAL 1200, and then edit the
exception in the Exceptions screen, adding an “R” to the Subrequirement
Pseudo-Course Name:

This will result in the ITAL 1200 course being added to the
NOT FROM line.
RM —
Requirement Modification 

The RM exception alters a requirement or
subrequirement.
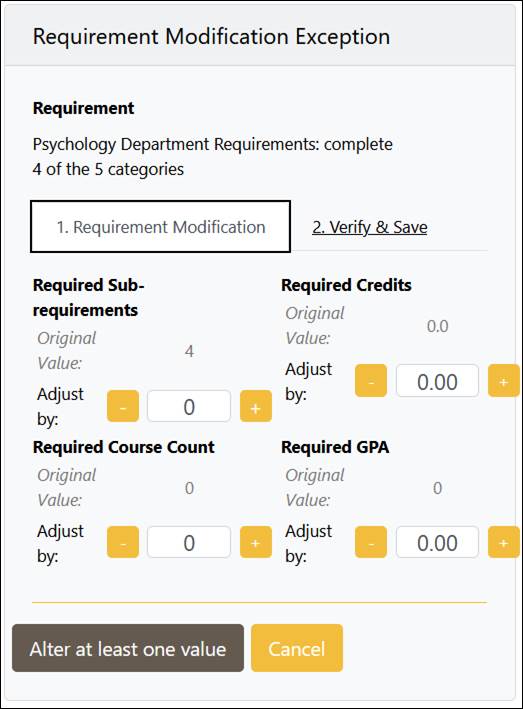
Required Sub-requirements
(requirement only): The default number of subrequirements needed to fulfill the
requirement displays in gray. Use the  and
and  icons
to increase or decrease the number of needed subrequirements. The value in the
Adjust by field will be added or subtracted from the value in the Original
Value when you save the exception.
icons
to increase or decrease the number of needed subrequirements. The value in the
Adjust by field will be added or subtracted from the value in the Original
Value when you save the exception.
A similar process applies for the Required Hours, Required
Course Count, and Required GPA fields.
After you finish adjusting the pertinent values, click
the Next button or the Verify & Save tab.
The Exceptions screen for the Requirement
Modification (RM) lists a number of additional fields, as follows.
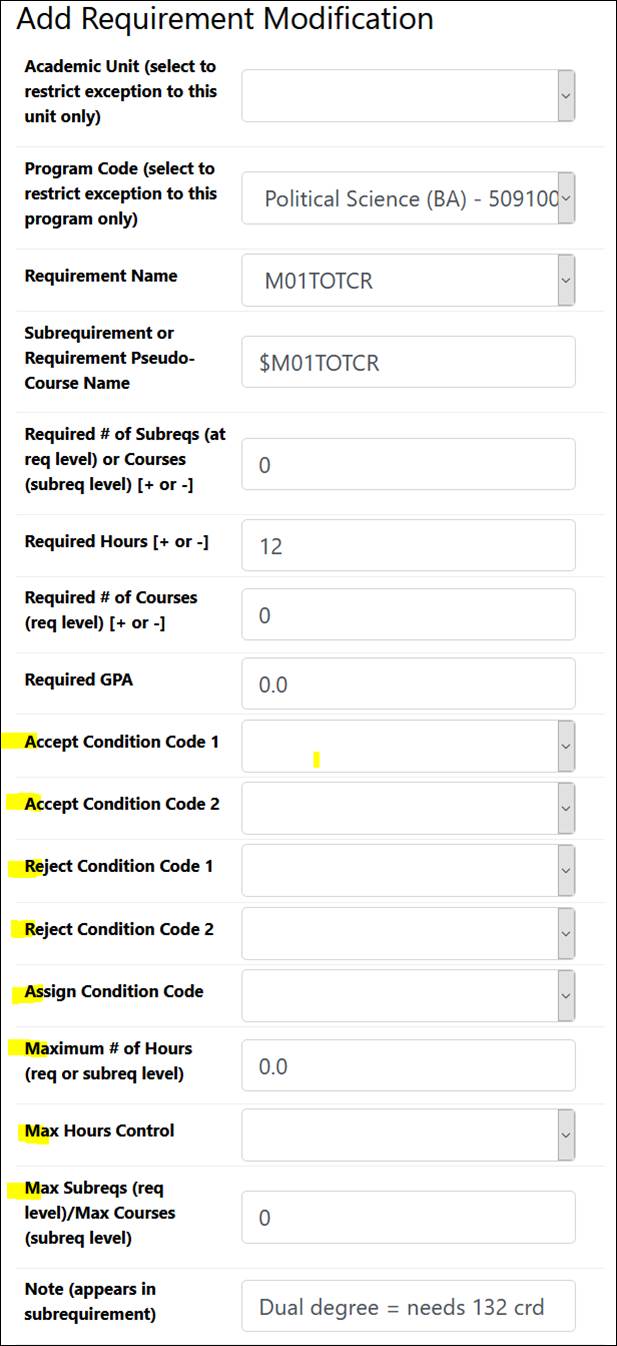
Accept/Reject Condition Code 1/2: Use
these fields to set additional course condition codes governing which courses should
be accepted/rejected by the requirement or subrequirement.
Assign Condition Code: Use
this field to assign condition codes to courses used to fulfill this
requirement or subrequirement.
Maximum # of Hours (req or subreq level): Use
this field to change the maximum number of credits that can apply towards
fulfillment of the requirement or subrequirement.
Max Hours Control: This
field controls a set of options managed by staff in the Office of the Registrar.
You should not set/attempt to change this field.
Max Subreqs (req level)/Max Courses (subreq
level): Use this field to change the maximum number of
subrequirements that can apply towards satisfaction of a requirement (or
courses that can apply towards satisfaction of a subrequirement).
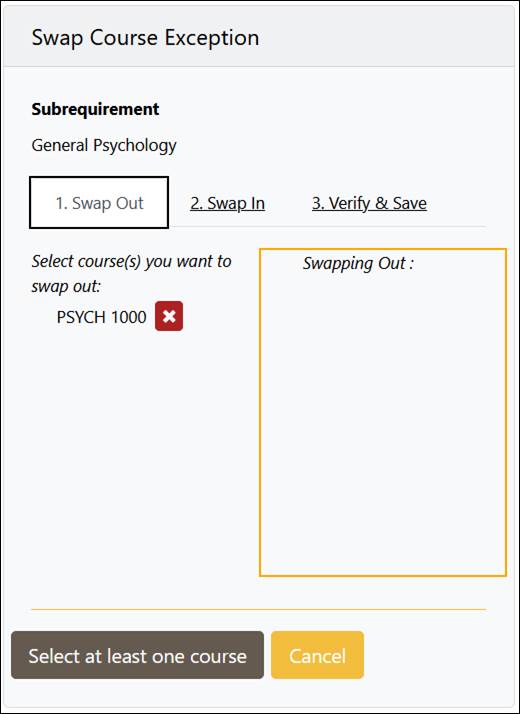
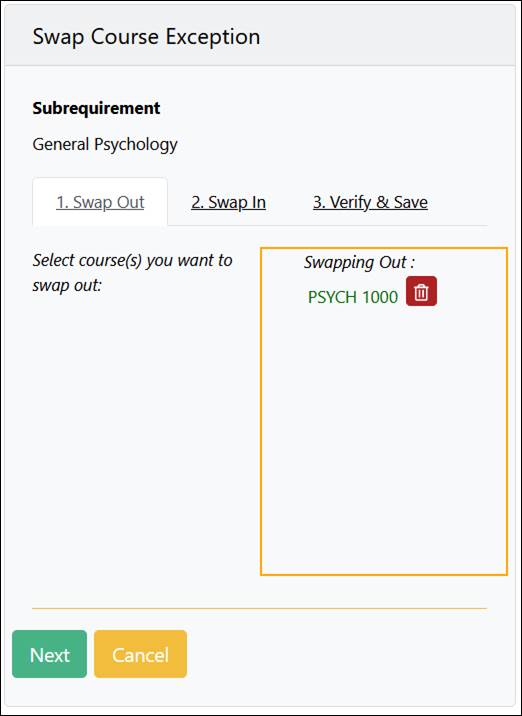
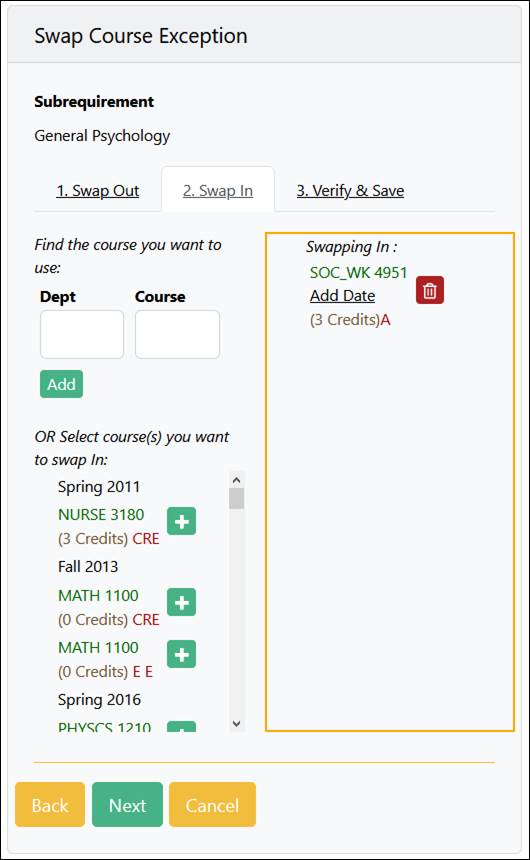
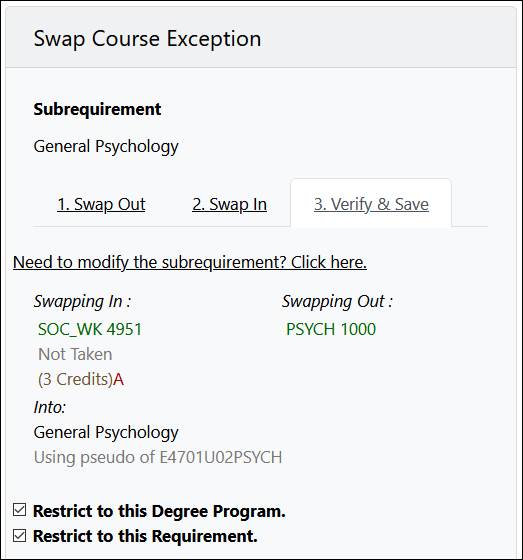
S — Swap Courses

The S exception removes one or more course(s) from,
and adds one or more course(s) to, a subrequirement’s SELECT FROM or NOT
FROM line. The number of removed and added courses need not be the same.
Its Swap Out tab works like a Delete (D)
exception and its Swap In tab like an Insert (I) exception.
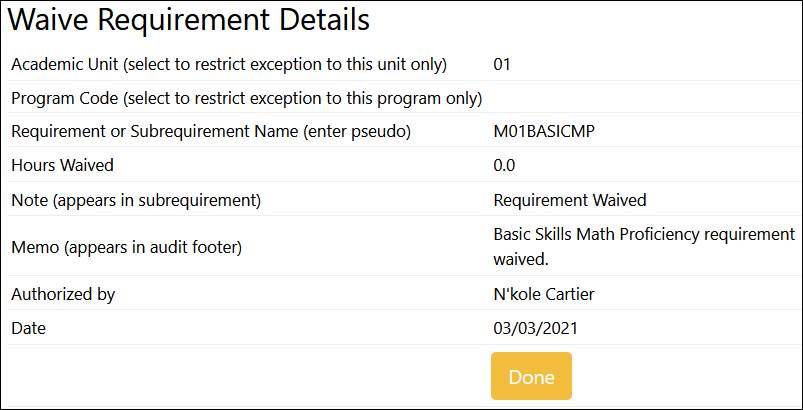
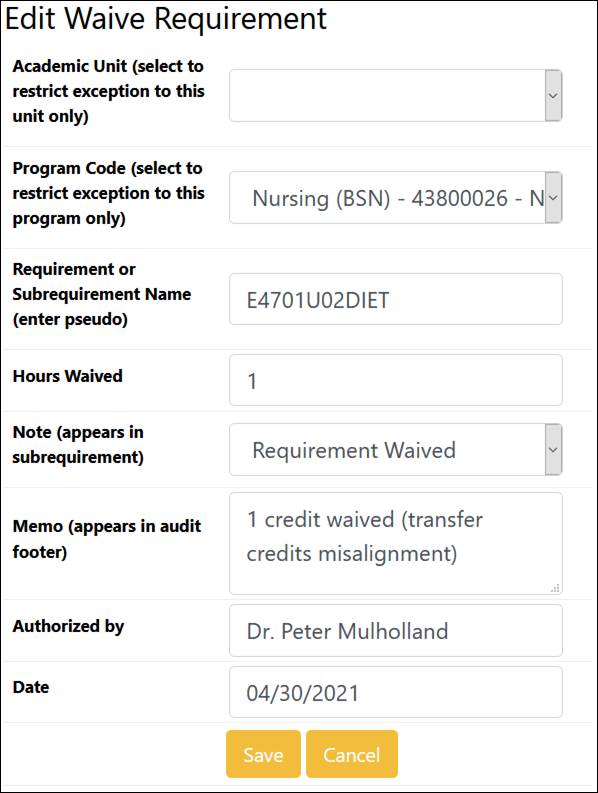
WR — Force
requirement or subrequirement complete 
The
WR exception forces the current Requirement or Sub-Requirement to
completion. While in exception mode, the force complete exception does not
require the entry of additional exception details beyond the common fields.
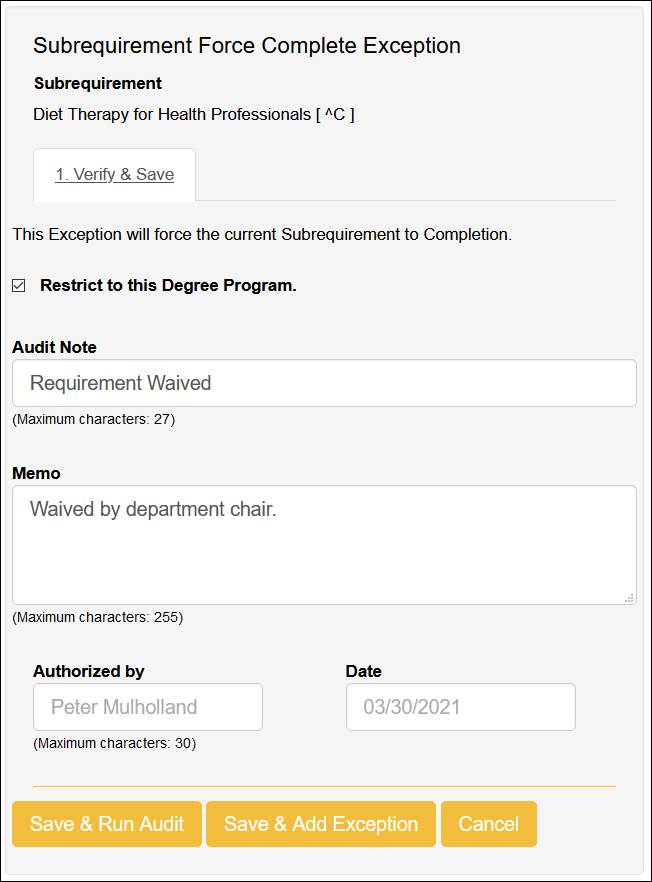
One additional field is available via the Exceptions
screen: Hours Waived. Use it to indicate how many credits are being
waived (in addition to waiving completion of the requirement). To do so, after
you create and save the exception in exception mode, edit it and note the
number of credits to be waived via the Exceptions screen.
You cannot create the following exceptions via the easy-to-use
interfaces available while in exception mode in an HTML report.
However, you can (and should) initiate the exception
creation process while in exception mode by clicking on the advanced exceptions
icon  , selecting an exception type from the
list
, selecting an exception type from the
list
and then completing the process in the Exceptions
screen, which will appear embedded next to the HTML audit report (or below it,
if screen resolution is such that it cannot display both screen side-by-side).
This causes several fields to auto-populate, thus reducing
data entry errors. Which fields auto-populate depend on the exception type.
Some examples are: academic unit, program of study, and pseudo course
information. The prepopulated fields will display a  icon
next to them. Clicking on the doesn’t do anything; it is
just informational.
icon
next to them. Clicking on the doesn’t do anything; it is
just informational.
You can also create these exceptions in the Exceptions
screen directly. This is not recommended, as fields will not auto-populate.
Exceptions created from exception mode always apply to a
specific requirement/subrequirement only.
Exceptions entered via the Exceptions screen are not
linked to a specific subrequirement, typically, but apply throughout the audit;
of these, the WH exception (Waive Hours) is the only one that applies to
a specific requirement/subrequirement.
The Exceptions screen for the Delete (D), Delete
All Courses in an AND or OR Set (DO), Insert (I), Swap (S),
and Requirement Modification (RM) exceptions includes a common
sub-screen to assist with entering course information.
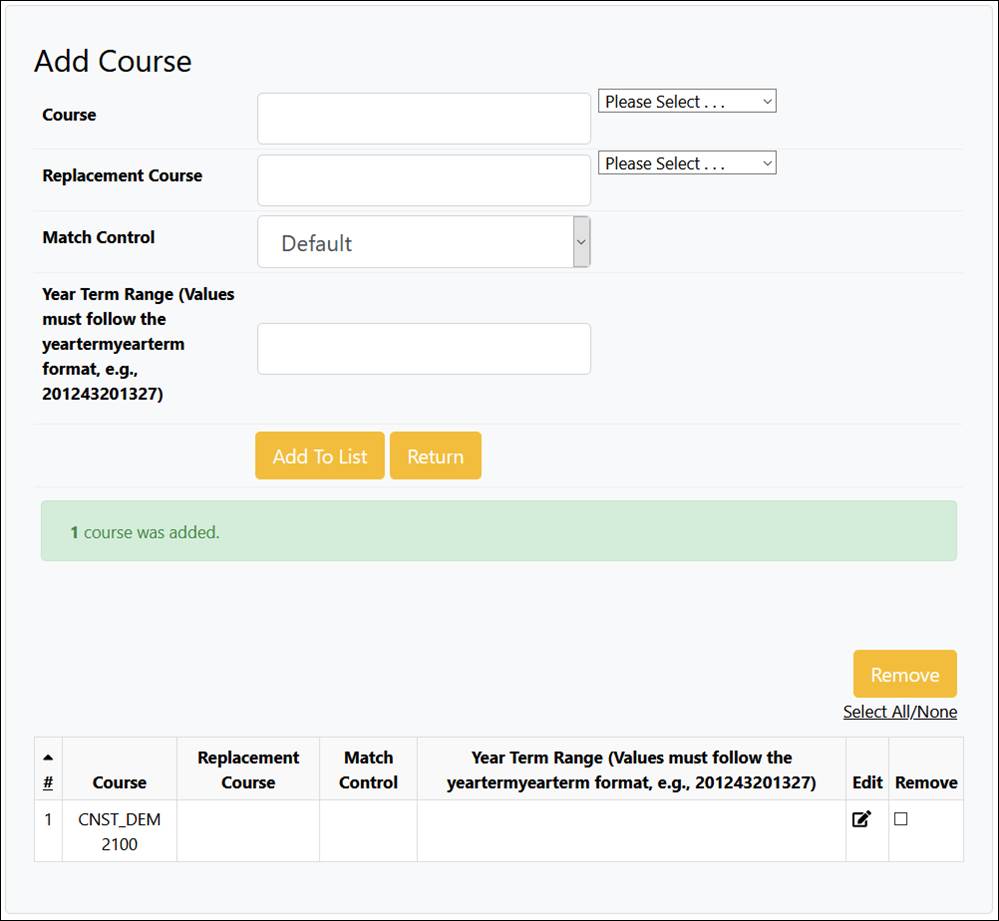
To access this screen, click the Add Course button
in the Exceptions screen.
Select a course using the drop-down lists that appear next
to the Course field.
For the Swap (S) exception only, select a course
using the drop-down lists that appear next to the Replacement Course
field. For all other exceptions, leave this field blank.
Leave the Match Control field set to the Default
value. Other options are available, but you should consult with a degree
audits staff in the Office of the Registrar prior to utilization.
You should add a value to the Year Term Range (Values
must follow the yeartermyearterm format, e.g., 201243201327) field if you
need to differentiate between multiple takings of the same course. The value
is the year and term the student took the course, typically repeated twice to
indicate a range of one term; a true range with different start and end values
could also be used under certain circumstances. The terms are encoded as
27=Spring, 35=Summer, and 43=Fall. The example above encodes a range from Fall
2012 to Spring 2013, inclusive.
Click the Add To List button to add the course to
the exception’s list of courses. When you are done adding courses, click the Return
button to return to the Exceptions screen. You must then save your
exception and courses by clicking the Save button on the Exceptions
screen; else, all the courses you added will be discarded.
The AC exception allows setting of a different catalog
year/term for specific portions of a degree audit.
Currently, the only portion of a degree audit that can be
set to a different catalog year via the AC exception is General Education, and
only for a very limited number of programs of study in Arts and Science.
Utilization is limited to students subject to the “Old Gen Ed” (prior to Fall
2019), who are attempting programs of study that did not exist prior to Fall
2019 and thus incorporate the “New Gen Ed” requirements (Fall 2019 and later).
Please contact degreeaudit@missouri.edu for assistance prior to
attempting to use this exception.
The CC exception can achieve two things:
1) Change
the identity of a course (it makes it into a new course).
The new course will match SELECT FROM and NOT FROM lines that
include the new course.
If the student took the new course as well, it will be a duplicate of the old
course (as the old course no longer exists but it is now an instance of the new
course).
Similarly, the old course will no longer match SELECT FROM and NOT
FROM lines that include the old course.
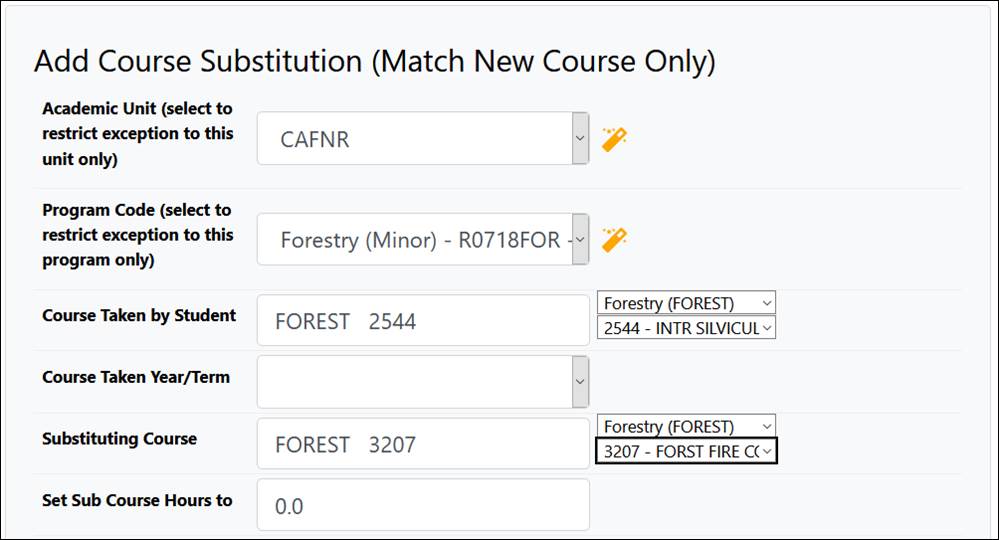
Select a course using the
drop-down lists that appear next to the Course Taken by Student field.
If the student took the course
more than once, specify which instance of the course you’d like to change, by
selecting a year and term value in the Course Taken Year/Term field. It
the student took the course multiple times in a term, then you may need to
create multiple CC exceptions; contact degreeaudit@missouri.edu for
assistance.
Select the substituting course
by using the drop-down lists that appear next to the Substituting Course field.
2) Add or remove condition codes to or from a course.
In this case, the course remains the same, but some of its attributes
(condition codes) change.
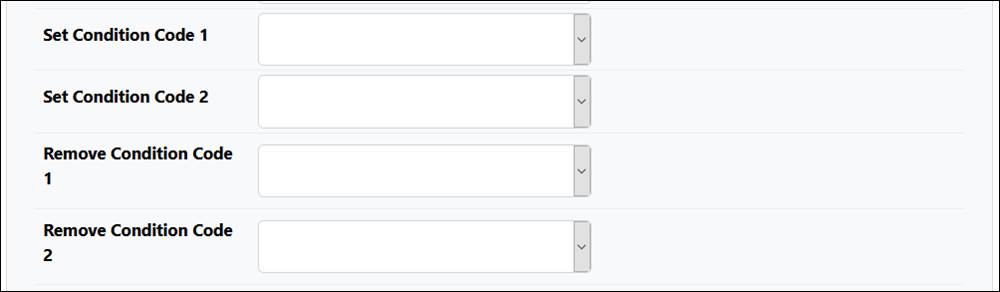
Select a course using the
drop-down lists that appear next to the Course Taken by Student field.
If the student took the course
more than once, specify which instance of the course you’d like to change, by
setting a year and term value in the Course Taken Year/Term field. It
the student took the course multiple times in a term, then you may need to
create multiple CC exceptions; contact degreeaudit@missouri.edu for
assistance.
Specify which condition code(s)
will be added or removed by selecting a value for the Set Condition Code
or Remove Condition Code fields using the drop-down list of values
provided. If you are unsure what the values on the list mean/do, contact degreeaudit@missouri.edu for
assistance.
Complete the common fields and
then click the appropriate save button to save the exception.
The CH exception reduces a course’s credits to the
desired value. GPA calculations take into consideration the reduced value.
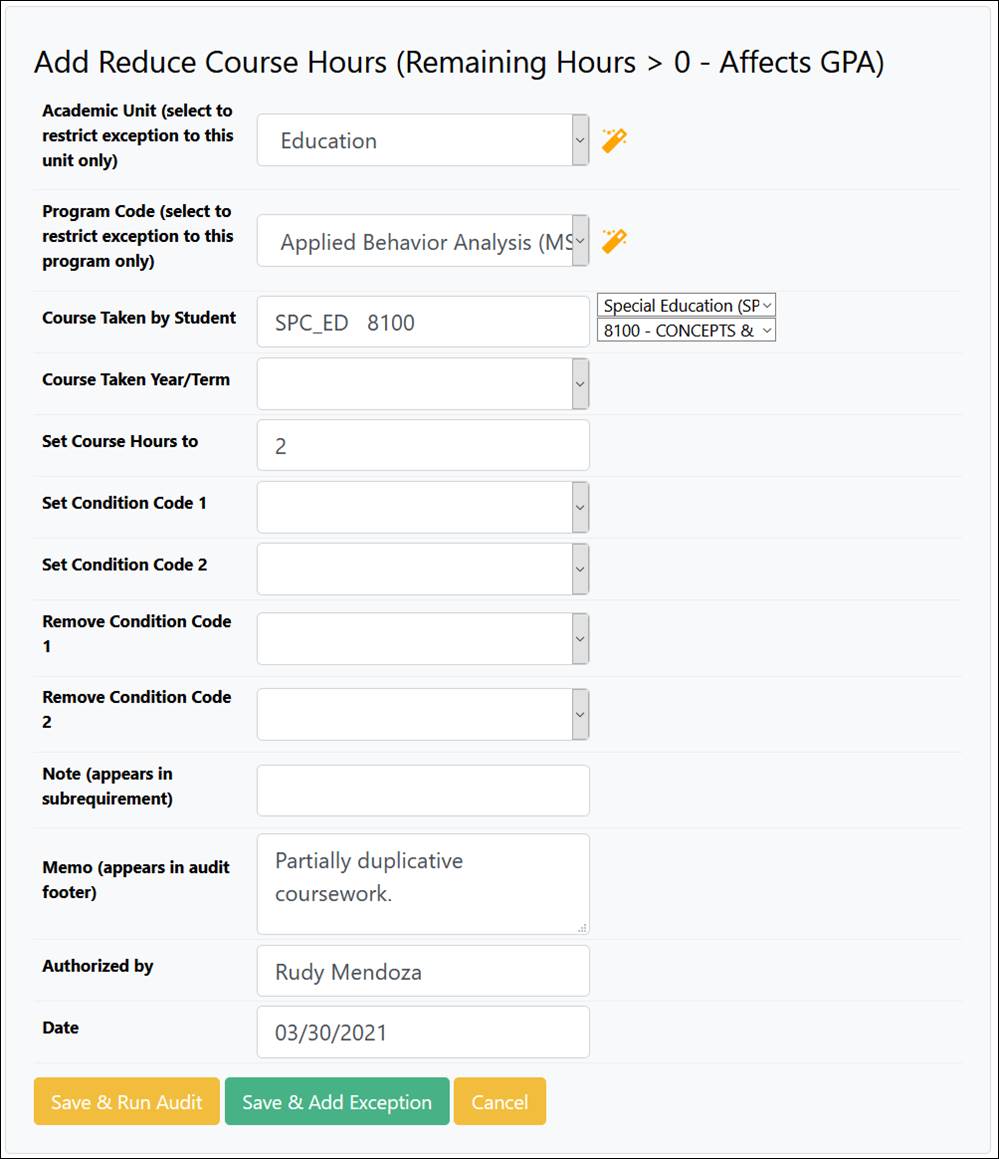 Select a course using the drop-down lists
that appear next to the Course Taken by Student field.
Select a course using the drop-down lists
that appear next to the Course Taken by Student field.
If the student took the course more than once, specify
which instance of the course you’d like to change, by setting a year and term
value in the Course Taken Year/Term field. It the student took the
course multiple times in a term, then you may need to create multiple CH
exceptions; contact degreeaudit@missouri.edu for
assistance.
Enter the new number of credits in the Set Course Hours
to field.
Specify which condition code(s) will be added or removed by
selecting a value for the Set Condition Code or Remove Condition Code
fields using the drop-down list of values provided. If you are unsure what the
values on the list mean/do, contact degreeaudit@missouri.edu for
assistance.
Complete the common fields and
then click the appropriate save button to save the exception.
The CS exception allows the course to match SELECT
FROM and NOT FROM lines both as itself and as a second course.

Select a course using the drop-down lists that appear next
to the Course Taken by Student field.
If the student took the course more than once, specify
which instance of the course you’d like to change, by setting a year and term
value in the Course Taken Year/Term field. It the student took the
course multiple times in a term, then you may need to create multiple CS exceptions;
contact degreeaudit@missouri.edu for
assistance.
By default, the second course inherits the first course’s
credits, flags, and condition codes; the second course keeps the course number
and title.
If you wish to decrease the number of credits for the second
course, enter the new number of credits in the Set Sub Course Hours to
field. GPA calculations take into consideration the reduced value.
To modify the second course’s condition code(s) select the
appropriate values in the Set Condition Code or Remove Condition Code
fields using the drop-down list of values provided. If you are unsure what the
values on the list mean/do, contact degreeaudit@missouri.edu for
assistance.
Complete the common fields and
then click the appropriate save button to save the exception.
The CT exception forces a course into a
subrequirement if the course’s title matches any of the titles in the SELECT
FROM or NOT FROM lines.
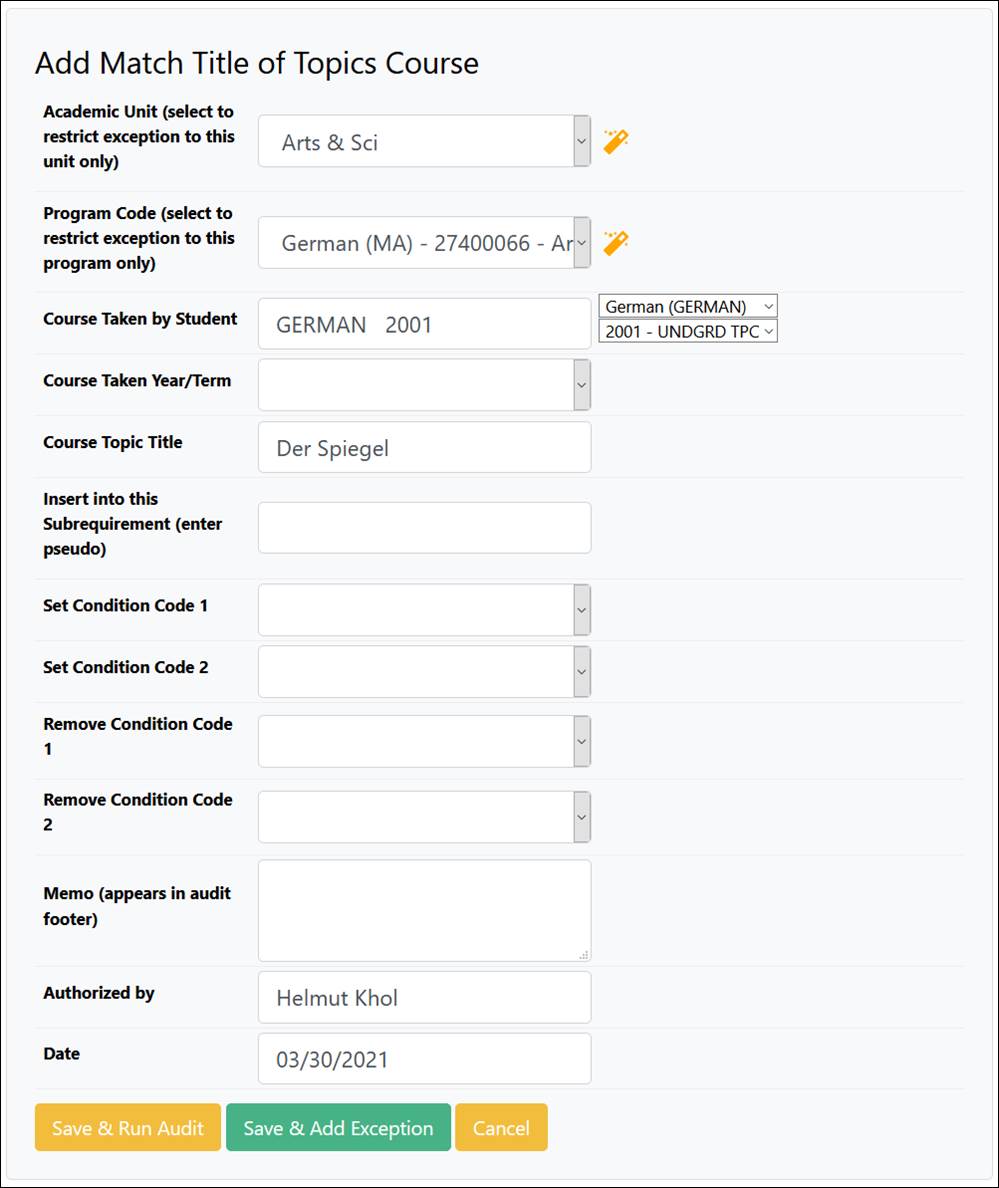
If the requirement/subrequirement is accepting/rejecting
courses based on specific condition codes, such constraints will be ignored. Do
not use the force course exception if you want the requirement/subrequirement
to accept/reject the course based on condition codes. If you want
condition codes to be respected, you should use an Insert exception
instead, adding the course title to the Note field of the Insert
exception.
Select a course using the drop-down lists that appear next
to the Course Taken by Student field.
If the student took the course more than once, specify
which instance of the course you’d like to use, by setting a year and term
value in the Course Taken Year/Term field. It the student took the
course multiple times in a term, then you may need to create multiple CT
exceptions; contact degreeaudit@missouri.edu for
assistance.
Enter the exact course title, as it appears in the audit
report, into the Course Topic Title. The field accepts the first 27
characters of the title only.
Enter the subrequirement’s name (pseudo code) in the Insert
into this Subrequirement (enter pseudo) field.
Specify which condition code(s) will be added or removed by
selecting a value for the Set Condition Code or Remove Condition Code
fields using the drop-down list of values provided. If you are unsure what the
values on the list mean/do, contact degreeaudit@missouri.edu for
assistance.
Complete the common fields and
then click the appropriate save button to save the exception.
The CX exception will reduce the credits for the
course to zero (0). GPA calculations take into consideration the reduced
value, i.e., the course’s credits/grade will have no impact on GPA calculations,
thus changing the GPA.
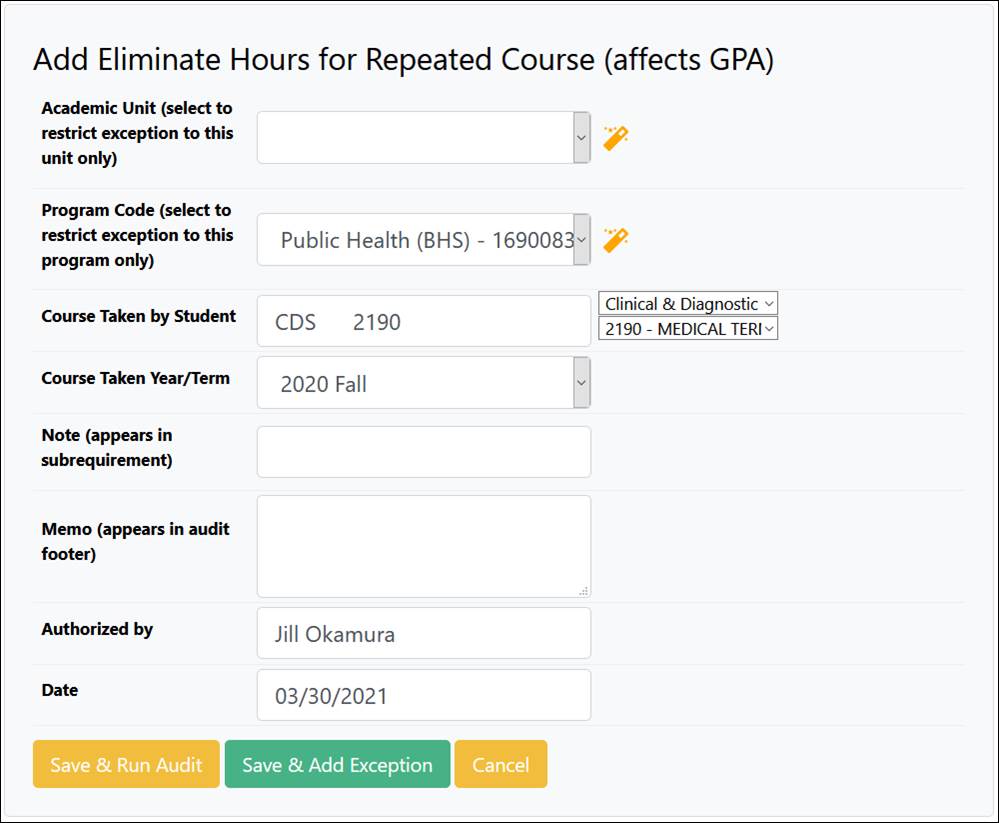
Select a course using the drop-down lists that appear next
to the Course Taken by Student field.
If the student took the course more than once, specify
which instance of the course you’d like to change, by setting a year and term
value in the Course Taken Year/Term field. It the student took the
course multiple times in a term, then you may need to create multiple CX
exceptions; contact degreeaudit@missouri.edu for
assistance.
Complete the common fields and
then click the appropriate save button to save the exception.
The CY exception is
like the CX exception in all regards, except that the course’s original
credits and grades continue to be included in GPA calculations.
The DO exception
removes all courses in an AND or OR set from the SELECT FROM
or NOT FROM lines. Only one of the set’s courses needs to be added to
the exception.
Provided that you accessed the
DO exception via the advanced exceptions icon  , all the
fields in the main screen will prepopulate, except the common fields. You do need
to add a course from the set via the Add Course button though (see
section Exceptions Available via the Exceptions Screen Only above for
details on how to add a course).
, all the
fields in the main screen will prepopulate, except the common fields. You do need
to add a course from the set via the Add Course button though (see
section Exceptions Available via the Exceptions Screen Only above for
details on how to add a course).
The DR exception allows insertion of an area of
study/concentration/track (“tracks”) to a degree audit.
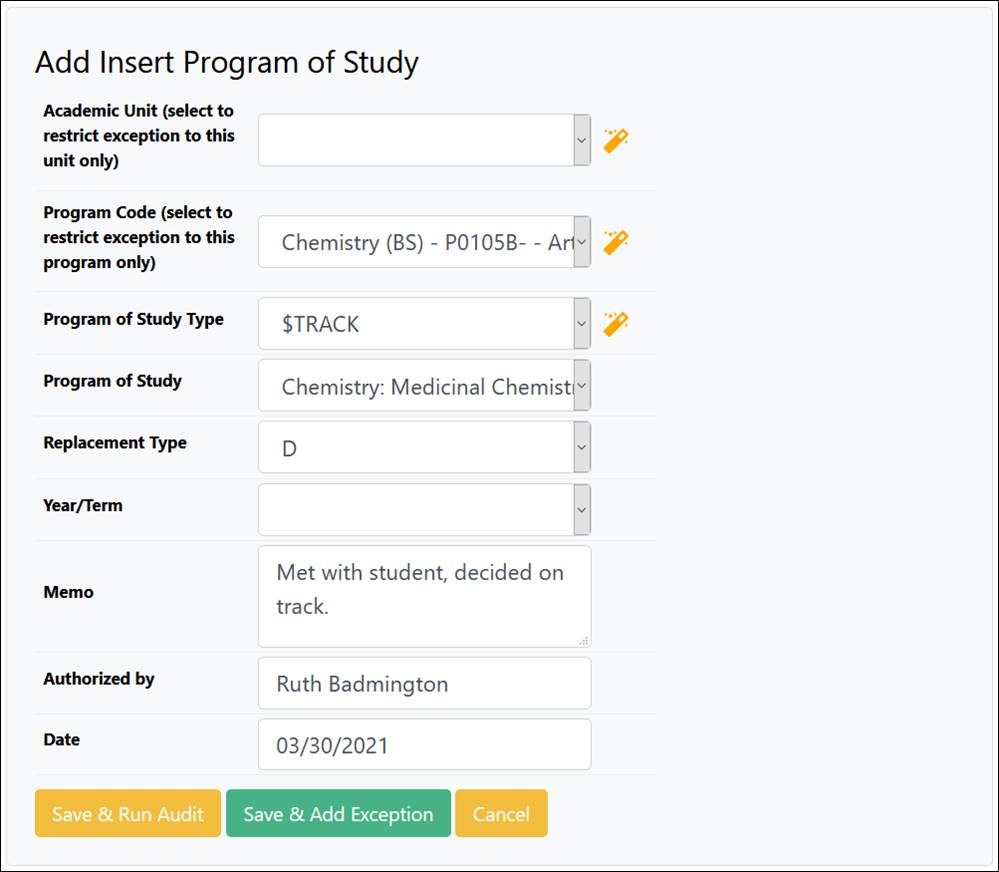
Select the Program Code for the degree to which you
wish to add a track.
Keep the default value of $TRACK in the Program
of Study Type field.
Select the track via the Program of Study LOV. Not
all degrees offer such options; also, newly added options may not yet be
encoded; if the LOV for the Program of Study field is empty, and you
believe there should be options to select from, please contact degreeaudit@misssouri.edu for
assistance.
Keep the default value of D in the Replacement Type
field.
Leave the Year/Term field blank, unless you wish to
use a version of the track with a catalog year other than the degree’s.
Complete the common fields and
then click the appropriate save button to save the exception.
The MM exception adds a memo to the bottom of the
audit.
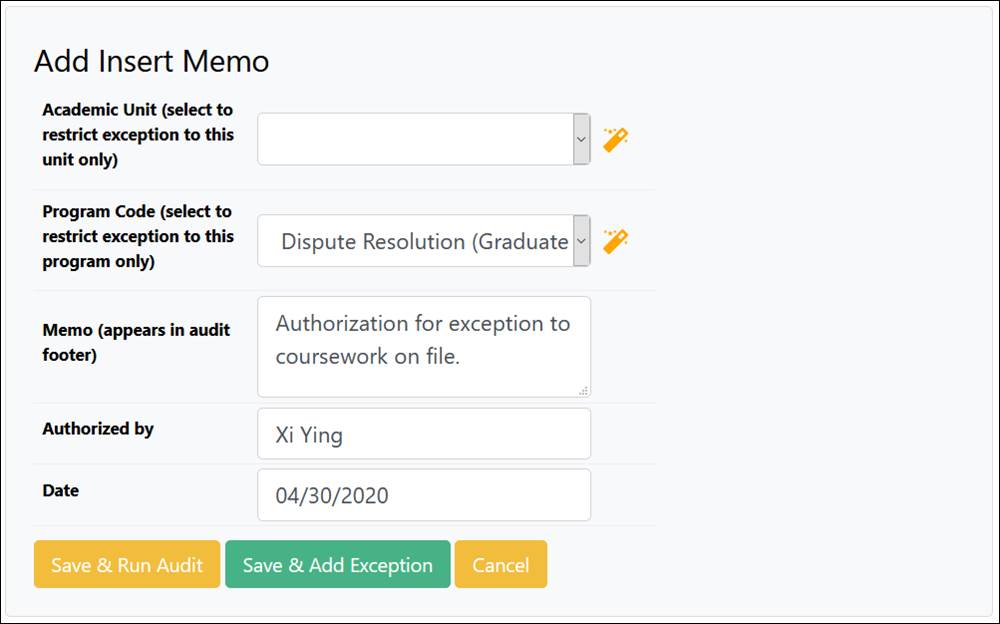
Enter a comment in the Memo field.
Complete the common fields and
then click the appropriate save button to save the exception.
The WC exception waives
a course wherever the course is required on the audit.
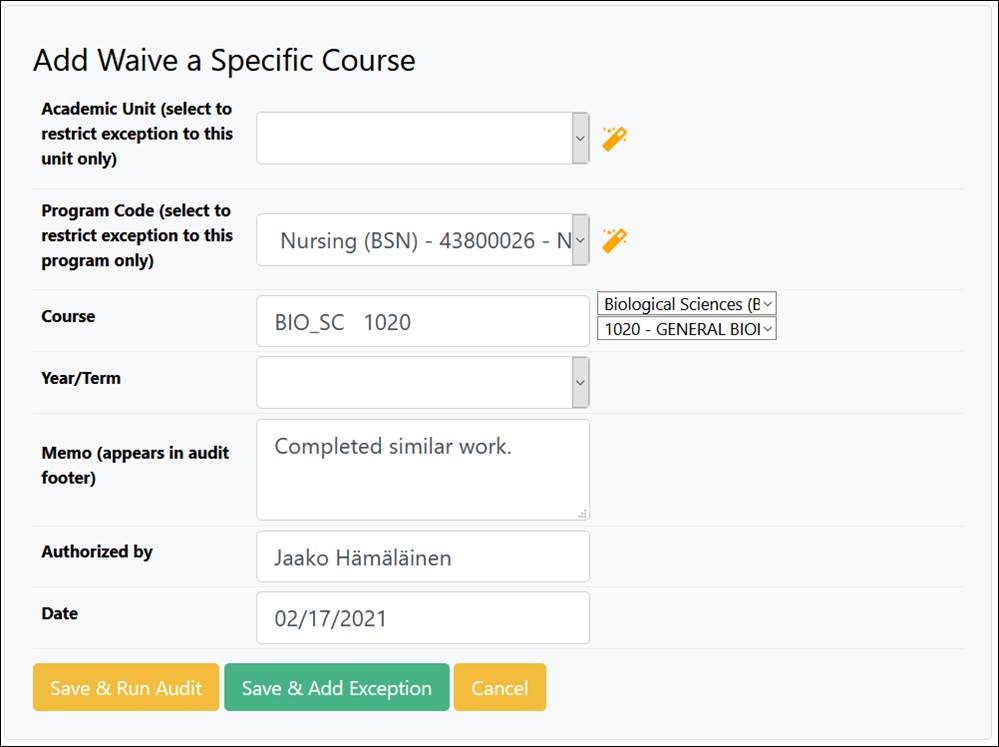
Select the course that is to
be considered as satisfactorily completed using the drop-down lists that appear
next to the Course field. The WC exception increases the
completed courses count by 1, but doesn’t affect credit earned nor GPA.
Year/Term: If
the course to be waived includes a range of acceptable terms, specify the term
when the student took the course be selecting a value from the drop-down list
of values. Otherwise, leave the field blank.
Complete the common fields and
then click the appropriate save button to save the exception.
The WH exception reduces the number of credits needed
to meet a requirement or subrequirement.
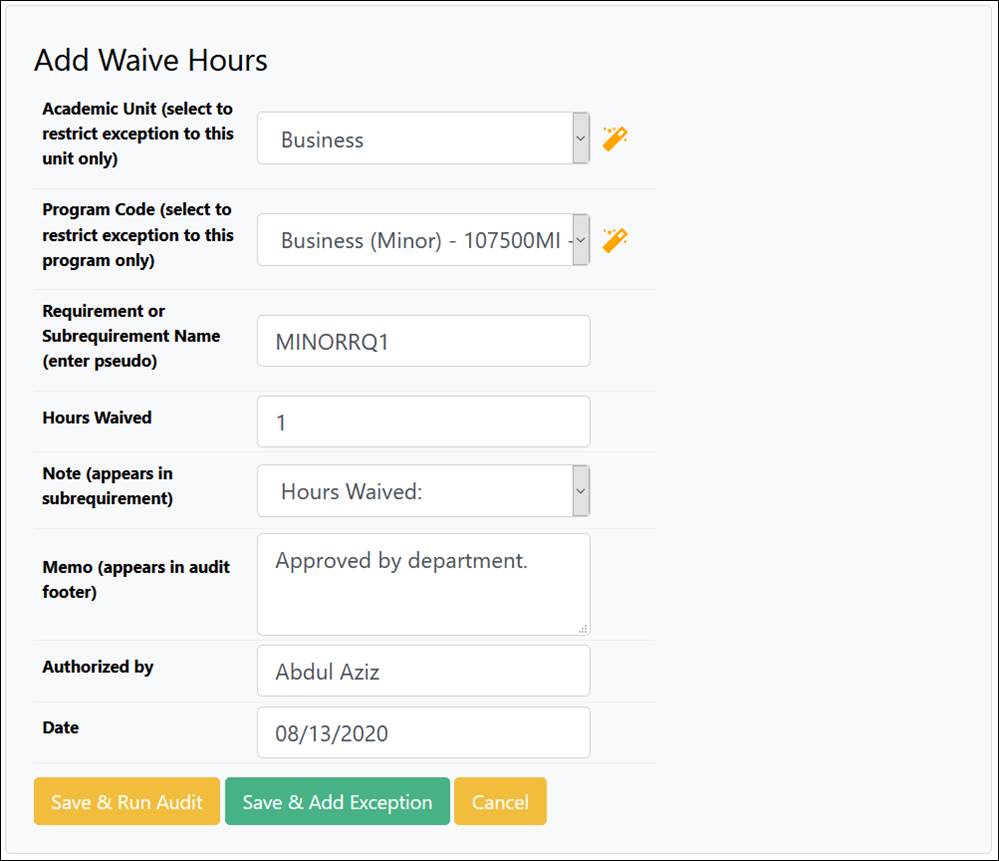
Enter the requirement/subrequirement name (pseudo code) in
the Requirement or Subrequirement Name field to specify which
requirement/subrequriement will be affected.
Enter the number of credits to be waived in the Hours
Waived field.
Complete the common fields and
then click the appropriate save button to save the exception.
Appendix II: Glossary

2-column PDF: Custom
degree audit report in the traditional 2-column text format. You cannot
request a degree audit report in this format, but you can view existing text
(batch only), HTML, and single-column PDF audit reports in 2-column PDF format.
UM Batch: Custom application to run
degree audits for multiple students via a single request.
Condition Code:
Code(s) associate with a student’s coursework that denote certain attributes.
e.g., condition code “C” means that the course has a grade
of C- or better, and “;” means the course has a grade of exactly C-.
Degree Audit: Process
of matching a student’s coursework to the requirements for completion of a
program of study.
Degree Audit Report: Outcome
of a degree audit performed using myDegreePlanner. Can be in text (batch
only), HTML, or PDF format.
HTML Audit: Default format for
degree audit reports. This format allows for interactive exception entry
(assuming you have access to creating exceptions).
PDF Audit (single column): Alternate
format for degree audit reports. It consists of a single-column PDF document.
Do not confuse with the 2-column PDF report (see above).
Program of Study: A
formally declared career objective as reflected in the student’s record in myZou.
Can be a degree (e.g., B.A. in History), minor (e.g., Aerospace Studies),
emphasis (e.g., Marketing), or certificate (e.g., Multicultural Studies).
Pseudo Code (requirement): Internal
name/tag for a requirement. Typically preceded by a $ symbol. e.g.,
for the Business Area requirement of various Business degree audits, the
requirement pseudo is $BUSAREA.
Pseudo Code (subrequirement): Name/tag
for courses associated with a subrequirement’s SELECT FROM and NOT
FROM lists. Typically, there are two pseudo codes per subrequirement: one
tagging courses in the SELECT FROM list and one for courses in the NOT
FROM list. They include the requirement pseudo and the subrequirement
number, with an R suffix added to the NOT FROM list pseudos.
e.g., for the Business Area requirement of various Business degree audits, the
requirement pseudo being $BUSAREA, the pseudos for its second subrequirement
would be BUSAREA2 and BUSAREA2R, respectively.
uAchieve ®: CollegeSource’s
name for the degree audit portion of myDegreePlanner. (CollegeSource is the
software vendor.)
Appendix III: Internet Explorer
Backward Compatibility 
myDegreePlanner runs in versions 11 and later of Internet
Explorer. If you have configured one of the supported versions to emulate
older versions for the missouri.edu web site, myDegreePlanner will not run
correctly in Internet Explorer.
You will need to remove the website from the Compatibility
View list:
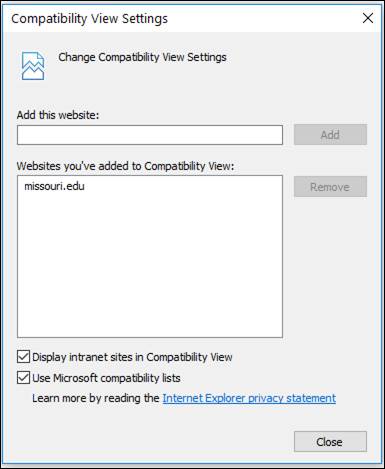
Appendix IV: Archived Reports 
Degree audit reports are visible via myDegreePlanner for
only seven days. However, a plain text copy of the 2-column PDF version of all
reports is stored indefinitely in the Data Warehouse.
You may access the archived reports at https://reports.umsystem.edu.
If the link automatically opens Microsoft Edge, please copy
and paste the link into a different browser, as Edge is not compatible with IBM
Cognos Analytics. We recommend Chrome, Firefox, or Internet Explorer.
To login, use your Active Directory domain\username and the
password you use to login to myZou. If your account has been migrated to the
UM-AD domain, username and password should suffice.
Then navigate as follows: Team Content >* UMC Reports
> myDegreePlanner > Degree Audits – Retrieve Archived Reports.
To search for the set of audit reports for a given student,
type the student ID in the Keywords: field and then press the Search
button.
Then highlight the student ID in the Choice field
and click the Next > button.
The list of available audit reports will display. Select
one from the list and click the Finish button.
Once the report displays, you may use the buttons at the
bottom left of the screen ( ) to navigate between pages.
To search again, click the Play icon  (top
left) and select the Reset prompts and run menu option. You can
begin a new search or simply click the Next > button to see the
results of the prior search.
(top
left) and select the Reset prompts and run menu option. You can
begin a new search or simply click the Next > button to see the
results of the prior search.
Notes:
Access is available to all
myDegreePlanner users.
The information in the Data
Warehouse updates nightly.
The reports are in plain text
format (no bold, italics, etc.).
A Final column displays
in the available audits list. This column indicates whether the report
contains the final degree audit for the listed program. To learn how to mark a
report as final, see the COM field description in the Advanced
Settings section above.